This is specific information about fitness.
| SHOULDERS | ||||||||
| TRAPS | ||||||||
| 1. Pull your shoulders back and slightly back w/ Barbell Shrugs. | ||||||||
| 2. Pull shoulders straight up when doing Machine and Dumbbell Shrugs. | ||||||||
| 3. These exercises also work the traps: Upright CG Row, Deadlifts, Shoulder Cable upright Row. | ||||||||
| MEDIAL DELTS | ||||||||
| 1. If you have narrow clavicles, and you want to look wider, then hit your medial. | ||||||||
| A. Cable laterals | ||||||||
| B. Wide-grip upright rows | ||||||||
| C. Bent-over laterals | ||||||||
| 2. Do Dumbbell laterals first and follow up with other exercises. | ||||||||
| BARBELL SHRUG | ||||||||
| 1. Do different grips and angles to bring out thickness. | ||||||||
| A. Use Dumbbell, Barbell, and Machine | ||||||||
| B. Do front and back Barbell shrugs | ||||||||
| SHOULDER JOINT | ||||||||
| Why: | ||||||||
| 1. Engages the chest, shoulders, and back. | ||||||||
| 2. Improves posture, core strength, and flexibility. | ||||||||
| What it does: | ||||||||
| 1. The shoulder has a ball-socket-socket-joint. | ||||||||
| 2. This joint causes abduct, adduct, rotation, and raise in man places. | ||||||||
| 3. It offers incredible ROM, and because of this it’s one of the most injured. | ||||||||
| What muscle it works: | ||||||||
| 1. SHOULDERS – Deltoids | ||||||||
| 2. SHOULDERS – Trapezius | ||||||||
| 3. BACK – Rhomboids | ||||||||
| 4. SHOULDERS – Rotator Cuff | ||||||||
| 5. CHEST – Pectorals | ||||||||
| 6. BACK – Latissumus Dorsi | ||||||||
| How to work it: | ||||||||
| Shoulder presses, Push-ups, Dumbbell presses, Shoulder Fyles, and Lat Pull-Downs | ||||||||
| Tips: | ||||||||
| The shoulder joint has a wide ROM, because of this the shoulder will become a source of pain at some point in life. We can limit this by maintenance of the rotator cuff muscles. | ||||||||
INJURIES & REHAB
The shoulder joint is the most flexible joint in the body, and one of the
less stable. It gives you maximum mobility, but at the same time instability
can lead to many problems.
On the posterior side of the shoulder is the rotator cuff, The rotator cuff is
made up of the supraspinatus, infraspinatus, teres minor, and subscapularis.
These four muscles stabilizes the shoulder. The joint is connected by the
head of the humerus and the glenoid fossa socket of the shoulder.
If you’re feeling pain in your rotator cuff, it’s because your internal rotators
are tight, pulling the humeral head forward and inward. If your external
rotators are weak, they can’t counteract the force. The pain is usually felt
in the shoulders, but could be coming from the chest, biceps, or back.
All upper-body exercises involve the rotator cuff to some extent. Many
of these exercises cause internal shoulder rotation.
THESE FOLLOWING EXERCISES TO PREVENT INJURIES
1, RESISTANCE BAND PLANK WITH EXTERNAL ROTATION
2, OVERHEAD WINDMILL
3. BOSU PUSHUP
These exercises are to be done to stabilize, strengthen, rehab, and prevent
injuries to the shoulder. Do not go heavy on these movements.
SHRUG
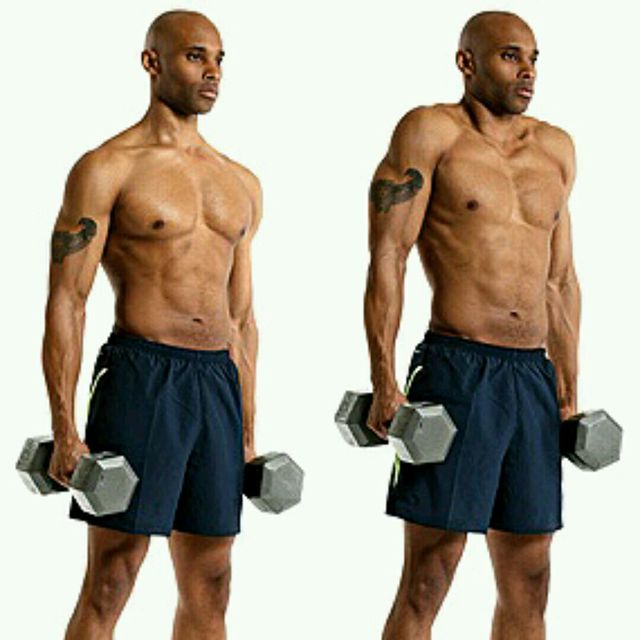
This exercise works the upper trapezius muscles. Which is the triangular bone in the back of the shoulders, Which is responsible for elevation of the shoulders, which is the movement of the shoulders when doing s shrug. This
improves the strength and mobility of the scapula (shoulder blade). The upper trapezius isn’t the only muscle involved in the shrug:
1. LEVATOR SCAPULAE
These muscles are at the sides and back of the neck and helps with the elevation of the scapula.
2. RHOMBOIDS
These muscles are located between the shoulder blades, and assist in retracting the scapula. The rhomboids isn’t really targeted in this movement as the upper trapezius.
3. STERNOCLEIDOMASTOID
This neck muscle plays a minor role in shoulder elevation.
The shrug makes the appearance of the shoulders look more broader and muscular.
KNEELING SHOULDER TAP PUSH-UP
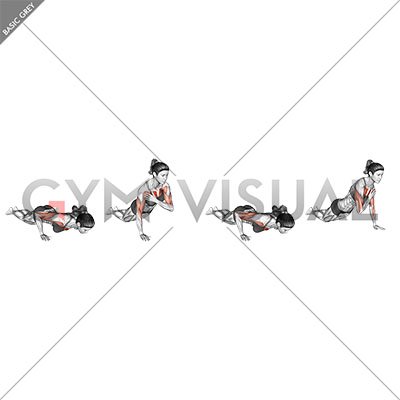
This exercise targets several muscle groups in the body, particularly in the
upper body. As far as the shoulder muscles, the main targeted areas are:
A. Deltoids: These are the primary muscles of the shoulders, and are made
up of three parts:
1. ANTERIOR DELTOID
This muscle is engaged during the push-up movement and lifting of the hand to the shoulder. It’s located on the front of the shoulder and helps in stabilizing the shoulder.
2. LATERAL DELTOID
This muscle stabilize the shoulder joint during the movement, and is located on the side of the shoulder.
3. POSTERIOR DELTOID
This muscle contributes to stabilization of the shoulder, but is less involved in the movement. It’s located on the back of the shoulder.
B. Rotator Cuff Muscles: These muscles stabilize the joint during the movement. The rotator cuff includes:
1. SUPRASPINATUS
2. INFRASPINATUS
3. TERES MINOR
4. SUBSCAPULARIS
Several upper body muscles are engaged during this exercise, such as the pectorals, triceps, and core muscles. They all help in stabilizing the body during the shoulder tap and push-up movements.
FINGER MARCHING
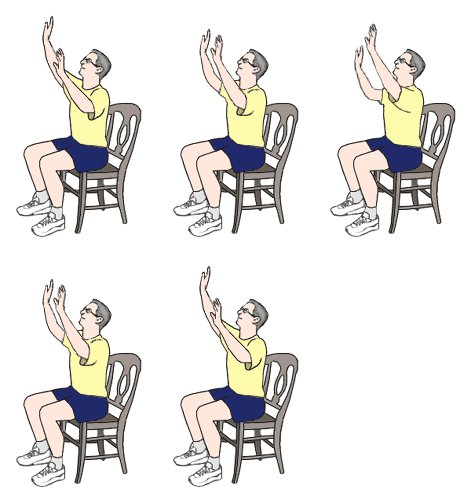
This exercise improve flexibility of these shoulders and strengthen the upper body. The following muscles are targeted in this exercise:
1. ANTERIOR DELTOID
This muscle helps in lifting the shoulder over the head.
2. ROTATOR CUFF MUSCLES
The rotator cuff includes:
A. SUPRASPINATUS
B. INFRASPINATUS
C. TERES MINOR
D. SUBSCAPULARIS
These muscles all stabilize the shoulder joint during the movement.
3. TRAPEZIUS
The upper trapezius assist in the elevation of the shoulder.
There are smaller muscles around the shoulder girdle that are engages during
this exercise, aiding in shoulder control and mobility.
DUMBBELL OVERHEAD PRESS

This exercise will add strength and size to the shoulders. While working the upper body. The targeted muscles in the press are:
A. Deltoids: These are the primary muscles of the shoulders, and are made
up of three parts:
1. ANTERIOR DELTOID (Front shoulder)
This muscle is heavily involved in pressing the weight upward.
2. LATERAL DELTOID (Side shoulder)
The middle of the deltoid muscle causes shoulder abduction, which is essential during the lift.
3. POSTERIOR DELTOID (Rear shoulder)
The rear shoulder is less involved, but stabilizes the shoulder joint during the press.
B. TRAPEZIUS
The upper trapezius assist in the elevation of the shoulder, and stabilize the scapula during the press.
C. ROTATOR CUFF MUSCLES
The rotator cuff includes:
A. SUPRASPINATUS
B. INFRASPINATUS
C. TERES MINOR
D. SUBSCAPULARIS
These muscles all stabilize the shoulder joint during the movement.
D. TRICEPS BRACHII
This muscle extends the elbow to push the weight overhead.
E. SERRATUS ANTERIOR
This muscle allows a full range of motion, by aiding the the upward rotation
of the scapula.
F. CORE MUSCLES
The rectus abdominis and obliques muscles stabilize the torso and maintains
proper posture during the press.
This exercise is great for building strength and engages the core, traps, and
triceps for a great upper body workout.
FORWARD PUNCHES
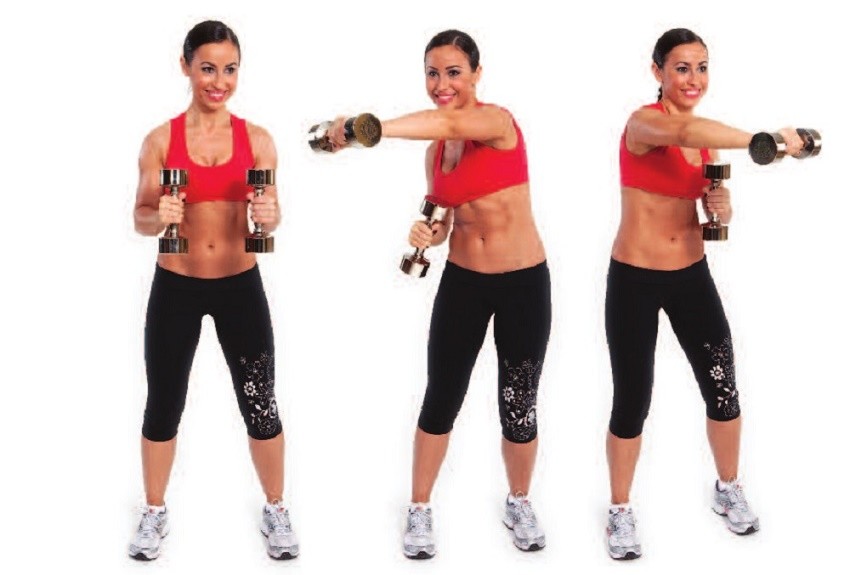
The forward punch is primarily used in martial arts and boxing, and targets the following muscles:
1. ANTERIOR DELTOID (Front shoulder)
This muscle is heavily involved in the forward movement and flexion of the shoulder. It causes the arm to move forward in the punch.
2. LATERAL DELTOID (Middle shoulder)
The middle of the deltoid muscle causes shoulder abduction, which is essential during the upward movement of the punch.
3. ROTATOR CUFF MUSCLES
The rotator cuff includes:
A. SUPRASPINATUS
B. INFRASPINATUS
C. TERES MINOR
D. SUBSCAPULARIS
These muscles all stabilize the shoulder joint during the movement, and helps
prevent injury during the punch.
These muscles work together with the chest, arms, and core muscles to produce a powerful punch.
| LEGS & HIPS | ||||||||||
| VASTUS LATERALIS | ||||||||||
| 1. To broaden the quads use a narrow stance on the leg press and hack squats. | ||||||||||
| 2. You can also point the toes inward w/ those exercises and the leg extension. | ||||||||||
| HIP JOINT | ||||||||||
| Why: | ||||||||||
| 1. Supports the weight of the body. | ||||||||||
| 2. Improves posture, strength and power. | ||||||||||
| What it does: | ||||||||||
| 1. It’s a ball and socket joint. | ||||||||||
| 2. This joint causes flexion, extension, adduction, abduction, internal/external rotation, and circumduction. | ||||||||||
| What muscles It works: | ||||||||||
| 1. The movement of the hip consist of seventeen muscles. | ||||||||||
| 2. They are divided into four groups: Adductor, Gluteal, Iliopsoas, and Lateral rotators. | ||||||||||
| How to work it: | ||||||||||
| Squats, Pelvic tilts, Piles, and Lunges | ||||||||||
| Tips: | ||||||||||
| To tighten up your butt, work your hips. | ||||||||||
| KNEE JOINT | ||||||||||
| Why: | ||||||||||
| 1. Keeps us upright and stable. | ||||||||||
| 2. It bears our body weight. | ||||||||||
| 3. Tone and strengthen the quads and hamstring. | ||||||||||
| What it does: | ||||||||||
| 1. It’s a synovial joint | ||||||||||
| 2. This joint causes flexion, extension | ||||||||||
| What muscles it works: | ||||||||||
| Quads, Hamstrings, Adductors, and Abductors | ||||||||||
| How to work it: | ||||||||||
| Squats, Leg extension, Leg curls, and Deadlifts | ||||||||||
| Tips: | ||||||||||
| The knees supports all your body weight, because of this they are very susceptible to injury. The best way to keep your knees healthy is to keep an appropriate weight. | ||||||||||
| QUADS BUILDERS | ||||||||||
| 1. These three moves will build thigh muscles. | ||||||||||
| A. Barbell front squat | ||||||||||
| B. Leg extension machine | ||||||||||
| C. Lunges | ||||||||||
| BUTT GUIDANCE | ||||||||||
| 1. If you want to lift the butt, then you have to move your legs backwards. | ||||||||||
| 2. If you want to isolate the glute muscles then perform the butt blaster or cable kickbacks. | ||||||||||
| 3. The best compound moves are lunges, squats, and steps-ups. | ||||||||||
| HOW TO IMPROVE | ||||||||||
| 1. Go heavy on squats, presses, and hack squats. | ||||||||||
| 2. Do high sets w/ high reps | ||||||||||
| FRONT SQUATS | ||||||||
| 1. My personal opinion on back squats is not to them, because of safety reasons. | ||||||||
| 2. This brings us to the front squat safety bar. | ||||||||
| 3. The bar has a pad in the center and two handles that point perpendicularly to the bar. | ||||||||
| 4. You place it on the base of the neck pointing backwards. | ||||||||
| 5. This apparatus makes the movement safer and easier to grip. | ||||||||
| 6. It allows you to breathe easier, and keeps your body upright. | ||||||||
| LET’S GO SLEDDING | ||||||||
| The sled push works your legs, glutes, and burn calories. | ||||||||
| Your gym might not have one, but don’t let that stop you. | ||||||||
| Here are some alternatives: | ||||||||
| 1. TREADMILL | ||||||||
| Place your hands on a turned off treadmill, and drive with your legs to move the belt. | ||||||||
| 2. SMOOTH FLOORS | ||||||||
| Place plates on a towel and push it around. | ||||||||
| 3. WALL PUSH | ||||||||
| Stand in front of a wall wear socks on a smooth surface. | ||||||||
| Lean into a wall and drive into the wall with your legs. |
|
THE HIP TILT FIX
The alignment of the spine is called the pelvic tilt. If the pelvic shifts out of the neutral position. It’s known as an anterior pelvic tilt (APT). APT occurs when the curvature of the lumber spine is excessive. The belly is pushed forward, and the glutes are pushed backwards causing stress on spinal joints and disks. Which causes the hip to rotate forward, and creates excessive joint reaction forces.
This condition can lead to poor posture, back, hip, and neck pain. This condition is usually caused by having weak glutes, abs, and tight hip flexors. You should incorporate these movements into your routine to improve you hip.
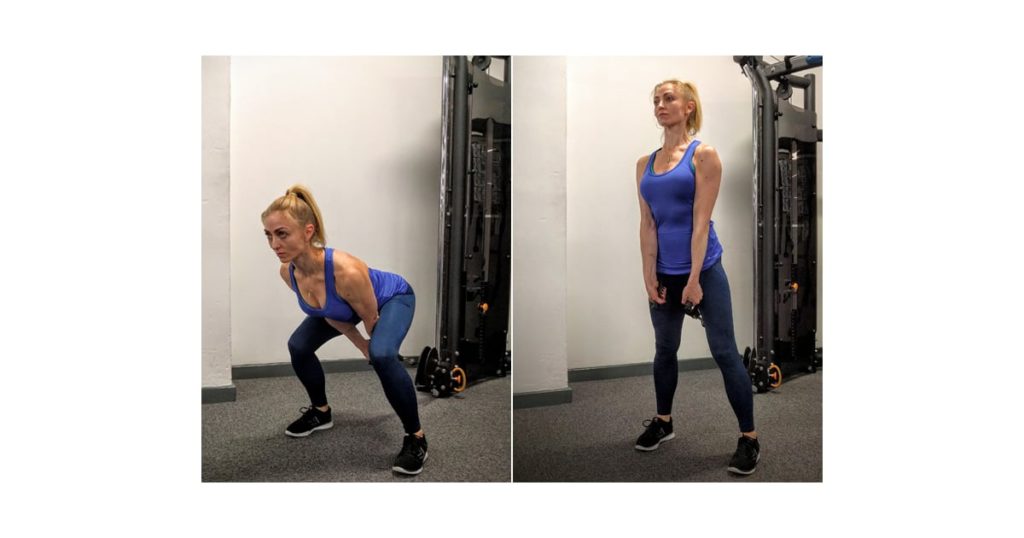
1. ROPE PULL-THROUGH
A. Attach a rope to a low cable.
B. Turn you back to the station, and grasp the rope between your legs.
C. Walk forward until you feel tension on the cable.
D. Extend your hips forward, as you ascend into a upright standing position
E. At the top squeeze you glutes.
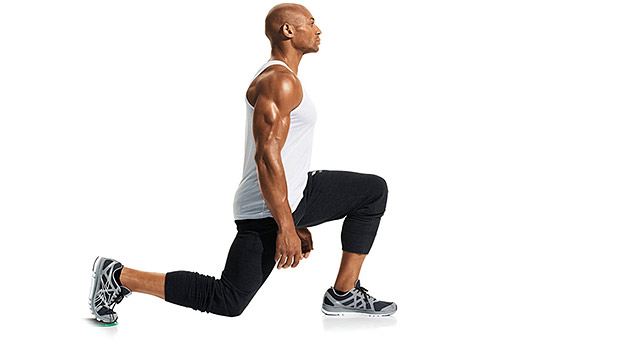
2. LUNGE STRETCH
A. Hold a static lunge for 30 seconds.
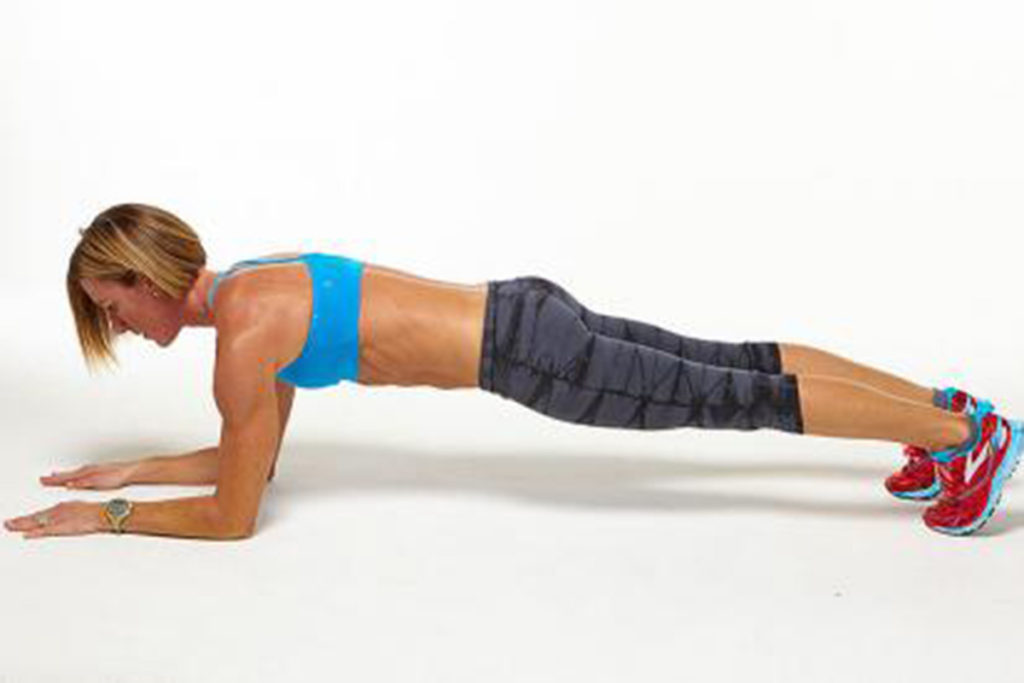
3. PLANK
A. Hold a forearm blank.
B. Begin at 15 seconds and work your way up.
LOWER BACk ACHES AND PAINS
You can spot and treat these common back aches and pains at home.
WHAT IT COULD BE:
Piriformis syndrome (a tight butt muscle) or a herniated disk. They both put pressure on the sciatic nerve in the back. We don’t know what causes piriformis syndrome, but a herniated disk occurs due to improper lifting techniques or sports that involves rotating of the torso.
DIY TREATMENT:
Take a pain reliever, rest if you’re sore, and perform non-weight bearing exercises. You can ride the stationary bike or do core exercises. Lying around is the last thing you want to do.
VISIT THE OFFICE:
If you are experiencing leg weakness, fever, or bladder changes see you doctor. You may have an infection or nerve compression.
HEEL ACHES AND PAINS
You can spot and treat this common heel aches and pains at home.
WHAT IT COULD BE:
If you are having inflammation at the bottom of your foot, which helps support your arch. You could have plantar fascitis which usually occurs because of overtraining, running on hard surfaces, or wearing worn-out running shoe.
DIY TREATMENT:
You can use heel inserts to help reduce pain and swelling. Switch from street running to trails.
VISIT THE OFFICE:
If you have severe pain, or you’re unable to rise up on yore toes or walk normally.
ANKLE ACHES AND PAINS
You can spot and treat this common ankle aches and pains at home.
WHAT IT COULD BE:
A sprain happens when the ligaments are stretched beyond their normal range.
DIY TREATMENT:
Use the RICE method: which consist of rest, ice three times a day for 20 minutes: compress with an elastic bandage: and elevate your foot above heart level as much as possible.
VISIT THE OFFICE:
If the foot is still in pain, swollen, or you still can’t put weight on it after three or four days.
HITT GLUTES
You want to get your butt strong, lean, and burn calories. It’s time to do HIIT cardio. You should go all out {20 seconds) and relax exercise (20-40 seconds). Use the following equipment to get the best results.
1. TREADMILL (JOGGING)
Treadmill activates 50% of the glute muscles. If you want to ramp it up, land on your heels while jogging.
2. ELLIPTICAL
This piece of equipment activates 33% of the glute muscles. If you want to ramp it up, ease your hips back.
3. STAIR MASTER
This piece of equipment activates 24% of the glute muscles. If you want to ramp it up, climb two steps at a time.
4. TREADMILL (WALKING)
This piece of equipment activates 24% of the glute muscles. If you want to ramp it up, use a 3% incline.
5. RECUMBENT BIKE
This piece of equipment activates 6% of the glute muscles. If you want to ramp it up, use an upright bike.
GLUTE BRIDGE
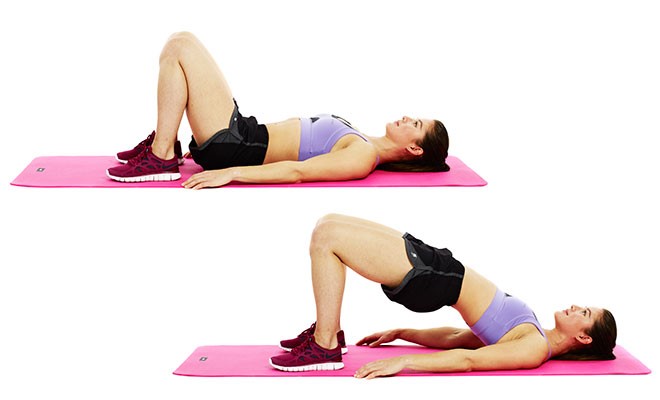
This exercise also known as the hip bridge, primarily targets the following muscles:
1. GLUTEUS MAXIMUS
This is the most activated muscle in this exercise, and is responsible for hips extension.
2. GLUTEUS MEDIUS AND MINIMUS
These two muscles help stabilize the pelvis during hip extension of the hips.
3. HIP FLEXORS (eccentrically)
The glute bridge primarily works when the hips are extended, but the hip flexors (like the
iliopsoas) are needed to control movement and stabilize the hips.
This exercise is great for activities of daily living, because it strengthens the muscles in the buttocks for squatting, jumping, and running. It reduces lower back pain by strengthening the core. If you are an athlete, then you want to incorporate the glute bridge in your routine. It makes the posterior chain stronger. Which improves the ability to run, jump and lifting. Which will improve your overall athletic performance. It’s also great for counteracting hip tightness by sitting for a long period of time or poor posture.
SIDE HIP RAISE
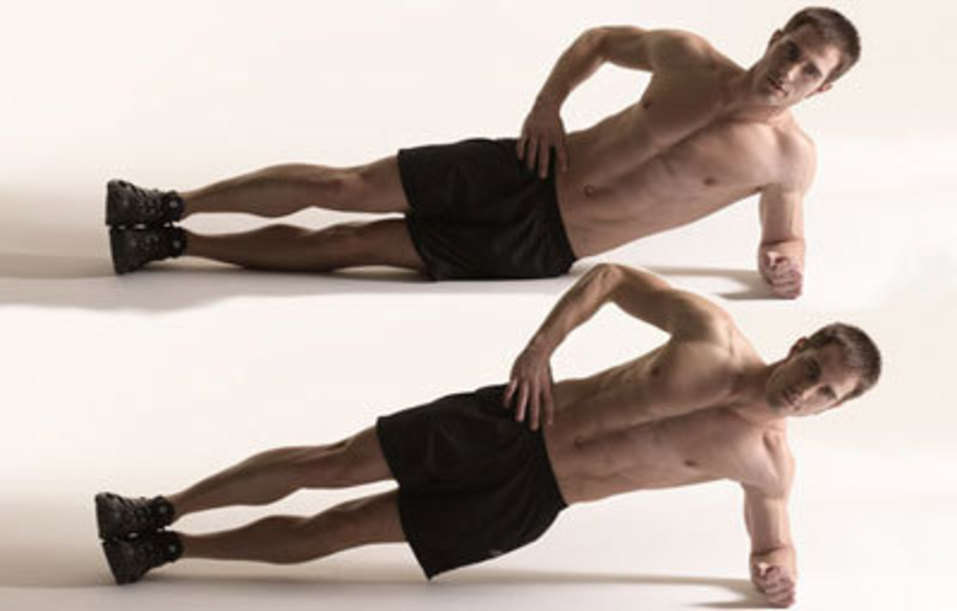
If you have arthritis in your hips. This exercise will minimize pain and strengthen the side hips muscles. It also helps with lower body endurance so you can step around objects and walk easily. These are the targeted muscles:
1. OBLIQUES (internal and external)
These muscles are found on the sides of the torso play a role in stabilizing the body and raising the hips off the ground
2. QUADRATUS LUMBORUM (QL)
This muscle is responsible for side bending and helps with raising the hips off the ground.
3. GLUTEUS MEDIUS AND MINIMUS
These two muscles help stabilize the pelvis during hip extension of the hips.
4. GLUTEUS MAXIMUS
This largest gluteal muscle is responsible for hips extension and stability.
5. HIP ADDUCTORS (inner thigh)
These muscles on the inner thigh help to stabilize the legs, especially the one that stays in contact with the floor.
6. ERECTOR SPINAE
These muscles help to stabilize and maintain the torso alignment while raising the hip.
This exercise hits the obliques and makes them stronger. Which is good for athletic activities and everyday movements, because it improves rotational strength and stability of the hip. It also helps with preventing lower back pain and injury by strengthening the quadratus lumborum. A deep muscle in the lower back. It builds functional strength, which gives you the ability to
perform activities of daily living like bending sideways, walking, and lifting. Strengthening these muscles can reduce falls and injuries, especially for the elderly. If you need to strengthen the hips or core after an injury, the side hip raise is a very good rehab exercise. I would do this exercise to improve my core and hip strength, and improve my overall functional fitness.
BENT KNEE HIP EXTENSION

This exercise also known as the donkey kick strengthen the muscles in the
lower body like the hip flexor and legs. The primary muscles involved are:
1. GLUTEUS MAXIMUS
This largest gluteal muscle is responsible for hips extension and stability.
2. HAMSTRINGS
These muscles assist in extending the hip, located at the back of the thigh.
3. GLUTEUS MEDIUS AND MINIMUS
These two muscles help stabilize the pelvis during the movement.
4. CORE MUSCLES
The lower back and abs stabilize the body during the exercise.
This exercise primarily targets the glutes, especially the gluteus maximus.
Which is crucial for hip extension, posture, and generating power to squat,
jump, and run. The stronger you can make your glutes. the less lower back
pain you will have. It’s a very low impact exercise on the hips and knees,
making it suitable for people with joint issues or in rehab. The bent hip
extension will strengthen the glutes, improve hip stability, and improve
overall lower-body function.
SIDE-LYING LATERAL LEG RAISE
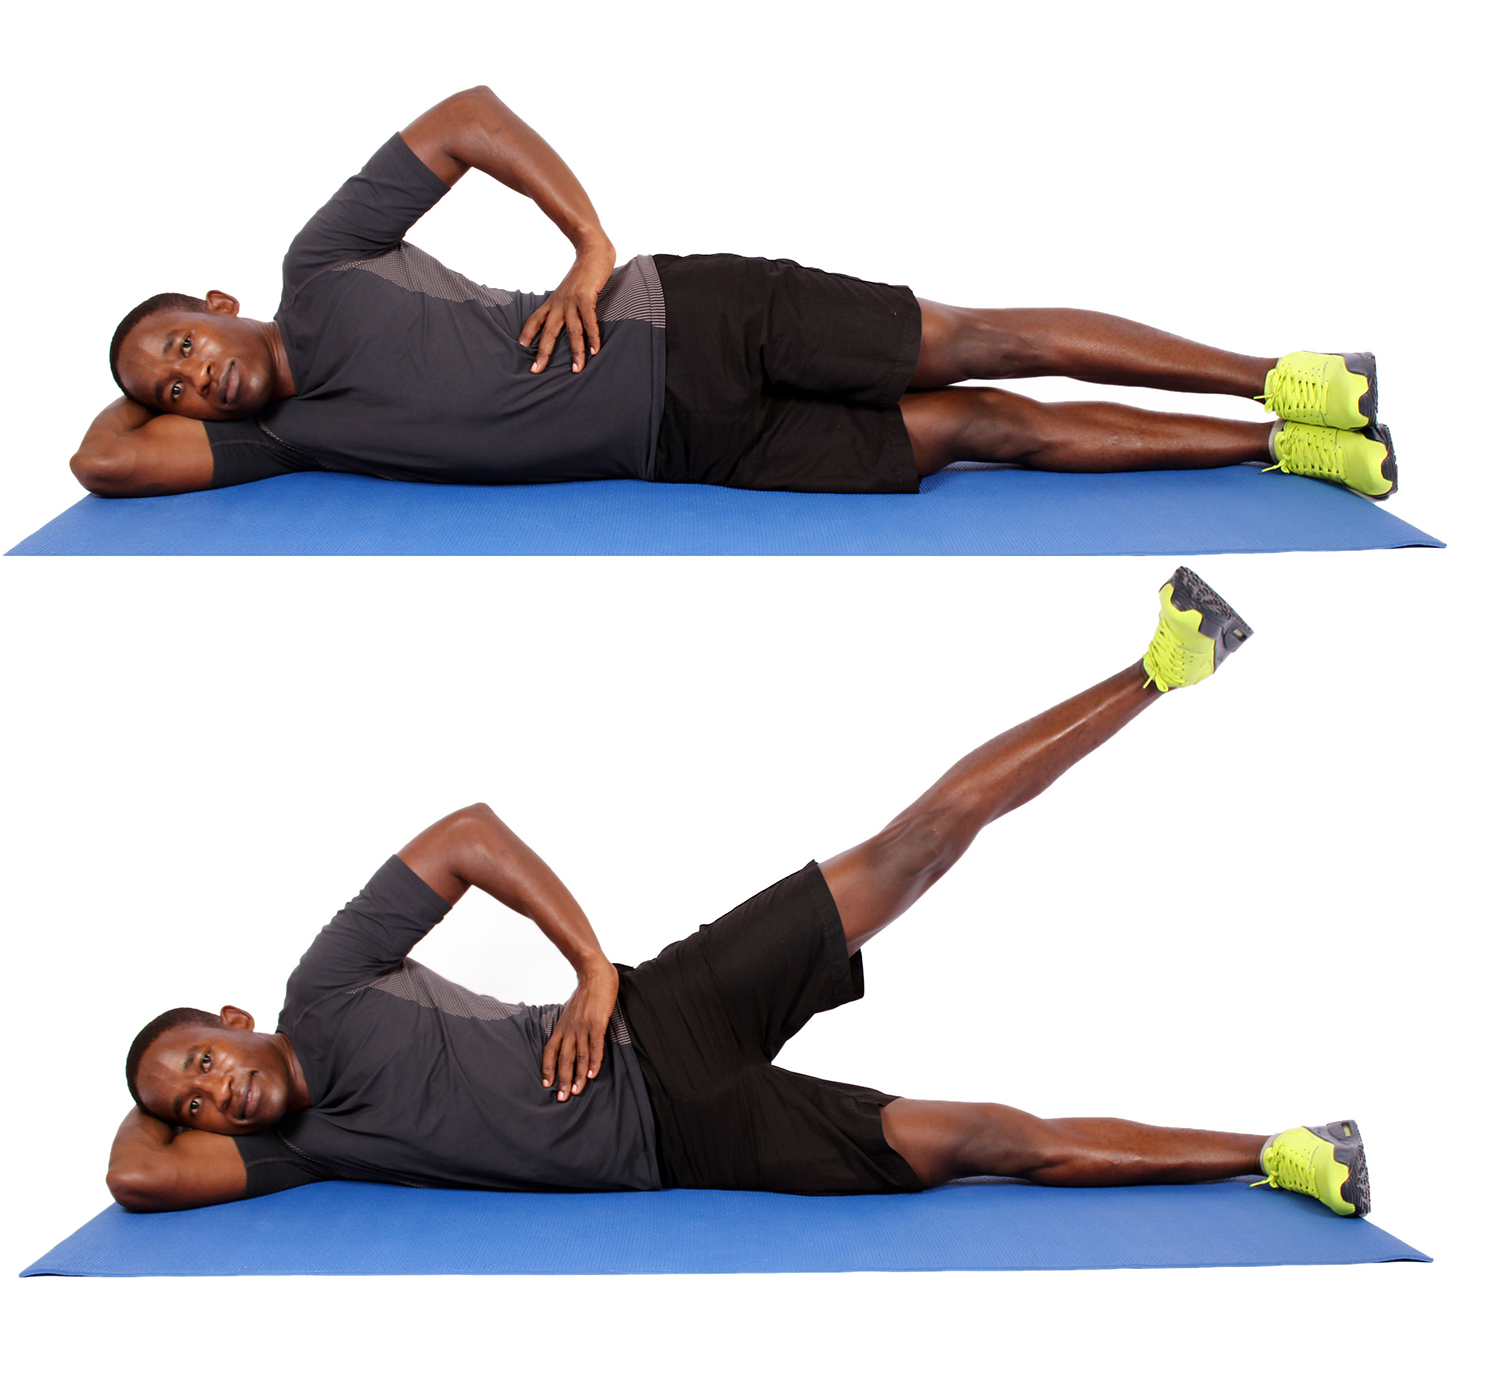
This exercise hits the muscles on the outer portion of the hip and thigh.
These are the targeted muscles:
1. GLUTEUS MEDIUS
This is the main muscle targeted, and helps with hip abduction (moving
the leg away from the body. While playing an important rule in stabilizing
the pelvis.
2. GLUTEUS MINIMUS
This muscle assist the gluteus medius with abducting the hip
and stabilizing the pelvis.
3. TENSOR FASCIAE LATAE (TFL)
This muscle assists in hip abduction and stabilizing the hip and knee joints, and
is located on the outer hip.
4. ILIOTIBIAL (IT) BAND
This fibrous band which isn’t a muscle. Works with the glute and TFL muscles
to stabilize the lateral aspect of the leg.
5. HIP ADDUCTORS
These small hip muscles are engaged to assist in stabilization and movement
during this exercise
Strong hips lead to better overall balance and stability. Which is important for doing daily activities like walking, running, and climbing stairs. This exercise makes the hip abductors stronger, which reduces strain on joints, helping to prevent injuries. It’s a very good exercise for athletes to improve their lateral movement in sports that require running, sudden change of direction or cutting (e,g., soccer, tennis, basketball). If you have an injury to the hip, lower back or knees. This is a very low-impact rehab movement exercise for recovery. If you want stronger hips and to improve your overall functional strength. Then you must include the side-lying leg raise in your routine.
LEG EXTENSION
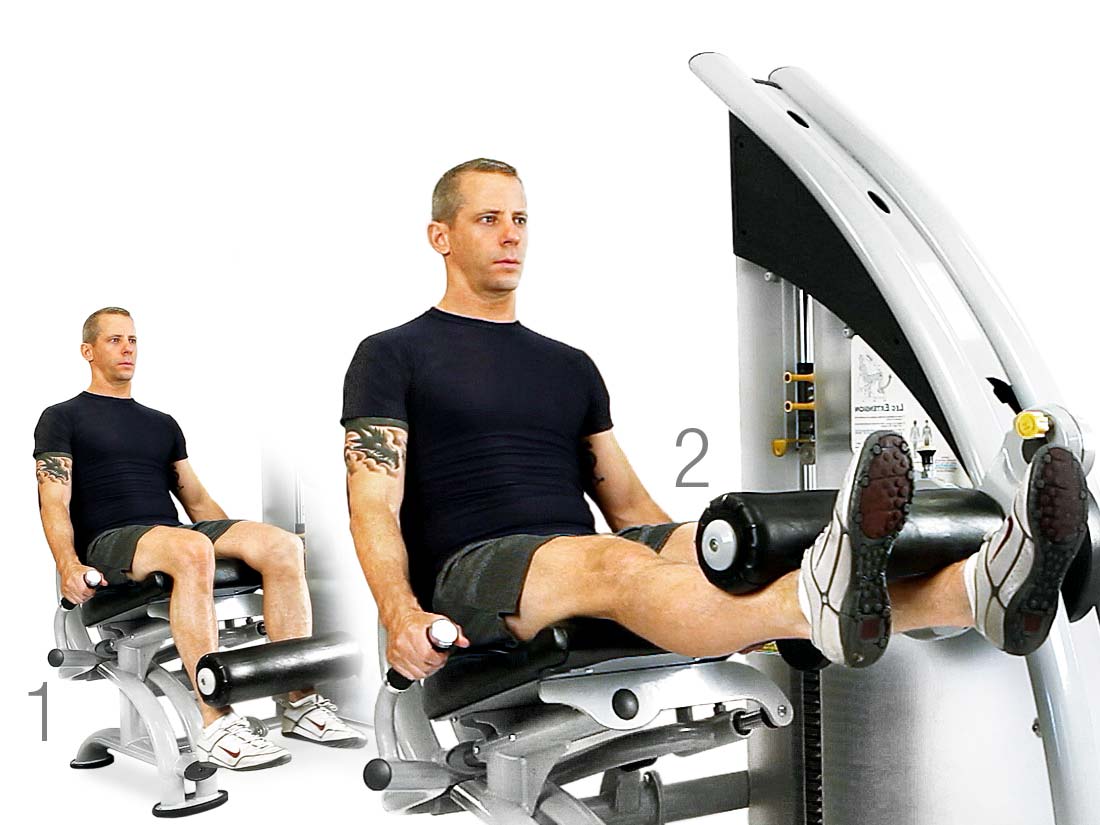
As we age the knee joints lose some of their range of motion and flexibility,
causing our ability to stand and fully extend the knee to become difficult.
Which is vital for every human being. This exercise targets the quadriceps,
the muscles located on the front of the thigh. These muscles consist of
four parts:
1. RECTUS FEMORIS
This is the middle muscle of the quads that assist with hip flexion.
2. VASTUS LATERALIS
The outer part of the thigh.
3. VASTUS MEDIALIS
The inner part of the thigh.
4. VASTUS INTERMEDIUS
This muscle is found below the rectus femoris, between the vastus lateralis
and vastus medialis.
This is a great exercise to isolate and target the quadriceps, especially to build
strength, muscle size, and definition on the front of the thighs. It’s also a good rehab exercise to rebuild strength in the quadriceps and minimizing stress on the knee compared to other exercises. If your goal is on aesthetics, the leg extensions will help define and sculpt the quadriceps, giving the legs a more muscular and balanced look. This is a very taxing exercise on the knee joint. So, it’s important to do other leg exercises, like leg presses or lunges, to limit overloading of the knee joint.
SQUAT CURL KNEE LIFT
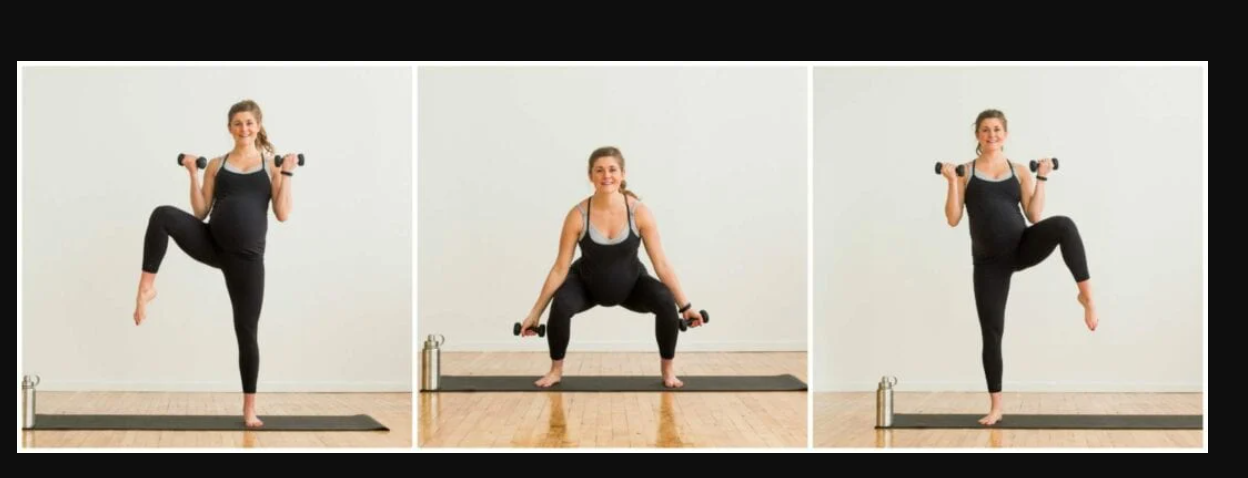
A lot of different muscles are worked in this multitasking strength exercise all at once, with a major focus on the knees and quadriceps. These are the hip muscles involved:
1, SQUAT
All three hip muscles (gluteus maximus, medius and minimus) are engaged while in the squat position.
2. KNEE LIFT
The hip flexors (iliopsoas and rectus femoris) work to raise the leg, and the gluteus medius on the other side helps with stabilizing the pelvis. The tensor fasciae latae (TFL) gets worked by abducting the leg to the side.
3. CURL
The curl primarily targets the biceps, but the squat position engages the hip flexors and stabilizers to maintain balance and form in the hips and core.
This is a full-body exercise that works multiple areas at once, and gives you a comprehensive workout in a short period of time. The combination of squatting and lifting of the knee challenges your coordination, and activates muscles in the hips, legs, and core to improve balance and control. It’s also a rehab exercise to be used to lessen the symptoms of arthritis and osteoporosis. It will improve the functional movement in the hips, legs, and core. Which are essential for daily activities and athletic movements.
STANDING LEG CURL
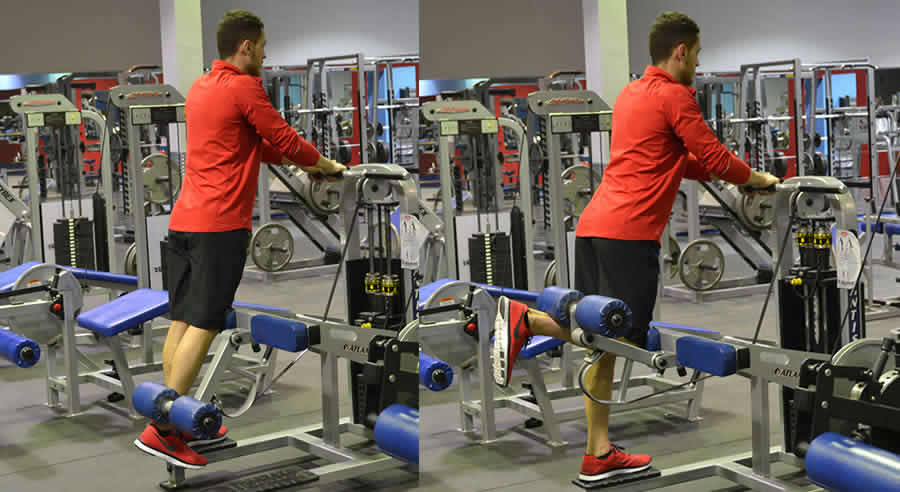
This exercise targets the hamstring muscles which are located on the back of the thigh. These muscles work to flex the knee and extend the hip. These are the activated muscles:
1, BICEPS FEMORIS (LONG & SHORT HEAD)
Located on the outer part of the leg.
2, SEMITENDINOSUS
Located in the middle of the leg.
3, semimembranosus
Located on the inner part of the leg.
If your goal is to strengthen or grow the hamstring, then this is a great isolation exercise that limits the use of other leg muscles. Strong hamstrings are very beneficial to athletes who perform explosive lower-body movements. The fact that the legs are worked individually, it can help to correct strength imbalances between the legs. This exercise also improves flexibility and balance.
MEDICINE BALL KNEE LIFT

This exercise targets the these hip flexor muscles:
1. ILIOPSOAS
The iliacus and psoas major are part of this group, which are key muscles to perform hip flexion.
2. RECTUS FEMORIS
This is the middle muscle of the quads that assist with hip flexion, and assist with lifting the knee to the chest.
3. TENSOR FASCIAE LATAE (TFL)
This muscle assists with hip flexion and stabilizes the pelvis, and is located on the outer hip.
4. HIP ADDUCTORS (inner thigh)
These muscles on the inner thigh help to stabilize the legs, especially the one that stays in contact with the floor.
5. GLUTEUS MEDIUS AND MINIMUS
These two muscles help stabilize the pelvis during the movement. Which is very important when it comes to balancing on one leg.
The core muscles also come into play to provide balance and control, as you lift the knee. This exercise strengthens the hip flexors and core. Which are essential for activities of daily living like walking and running. It builds core strength and endurance, by holding the medicine ball, your core has to do more work to maintain balance. If you play a sport like basketball or soccer that requires quick lower body movements. This exercise is very beneficial, because when you combine the resistance from the medicine ball, and the explosive movement of the knee. It improves your lower body power. The stepping and lifting movements of this exercise mimics everyday life, and improves functional fitness. Which enhances strength, coordination, and stability.
CHAIR STAND
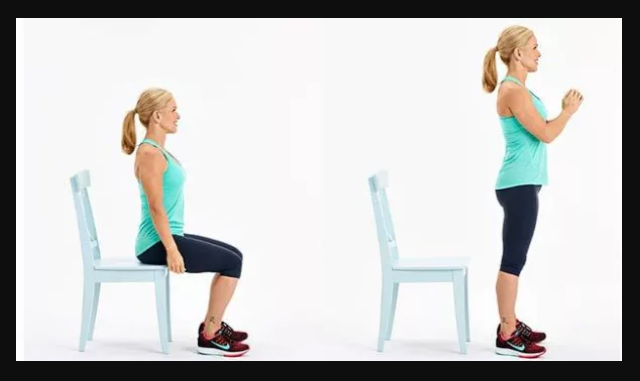
The chair stand is used as a functional training exercise that mimic everyday movements that strengthens the lower body, by targeting the following muscles:
1. QUADRICEPS
These are four muscles located on the front of the thigh, and are engaged when you rise from the seated position.
2. HAMSTRINGS
These muscles assist in extending the hip, located at the back of the thigh, and help control the movement as you stand.
3. GLUTEUS MAXIMUS
This largest gluteal muscle is responsible for hips extension and stability. The lower the chair. the more the glutes are involved in pushing you upward.
4, CALVES
These provide stability as you come up on your feet.
5. CORE MUSCLES
The lower back and abs stabilize the body during this exercise, helping with balance and maintaining an upright position.
This exercise builds lower body strength that is needed for standing, running, and stair climbing. It helps with balance by engaging the core and leg muscles to improve overall stability to reduce falls. It can increase joint mobility and flexibility over time , by promoting hip joint movement and healthy knees. It’s also a low-impact rehab exercise for those recovering from injury. The chair stand is very beneficial for maintaining lower body strength and independence.
STANDING CALF RAISES
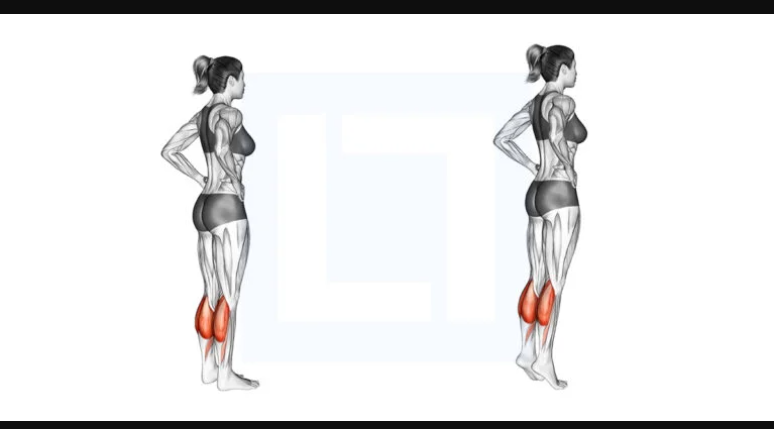
This exercise targets the large muscles of the lower leg, particularly the calves. The muscles worked include:
1. GASTROCNEMIUS
When it comes to lifting the heels off the ground, this muscle assists in plantar flexion, and primarily works when the knees are straight, such as the standing calf raise. It’s the largest muscle of the calf that gives them their rounded shape.
2. SOLEUS
The soleus is located below the gastrocnemius and is also responsible for plantar flexion, but it works when the knees are bent.
3. TIBIALIS POSTERIOR
This deep muscle helps with stabilizing the ankle as you raise onto your toes, while supporting the arch of the foot and assisting with plantar flexion.
4, INTRINSIC FOOT MUSCLES
These are small muscles in the feet that help stabilize the foot and support balance during the calf raise.
5. GLUTEUS MEDIUS AND MINIMUS
These two muscles help stabilize the hip to maintain balance, especially when performing a single-leg raise.
This exercise is an effective way to strengthen and develop the calves, build lower-body endurance, and improve ankle stability.
CHAIR SQUAT
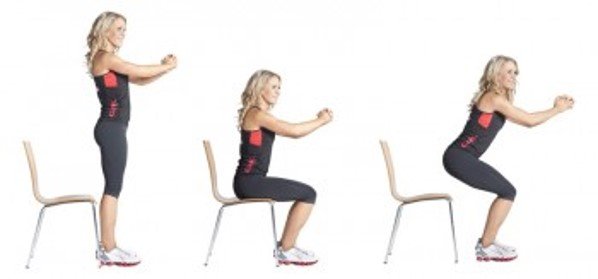
This exercise gives you the same benefits of a standard squat, by ensuring the safety of not falling. The chair squat targets the following lower-body muscle groups:
1. QUADRICEPS
These are four muscles located on the front of the thigh that are engaged when you straighten your legs to stand up.
2. HAMSTRINGS
These muscles assist in the downward motion, are located at the back of the thigh, and help with stabilization during the movement.
3. GLUTEUS MAXIMUS
This largest gluteal muscle is responsible for hips extension and stability. The lower the chair, the more the glutes are involved in pushing you upward.
4. CALVES
These provide stability as you come up on your feet.
5. HIP ADDUCTORS (inner thigh)
These muscles on the inner thigh help to stabilize the legs.
This exercise will improve strength, balance, functional movement, and is beginner-friendly for seniors.
LYING LEG CURL
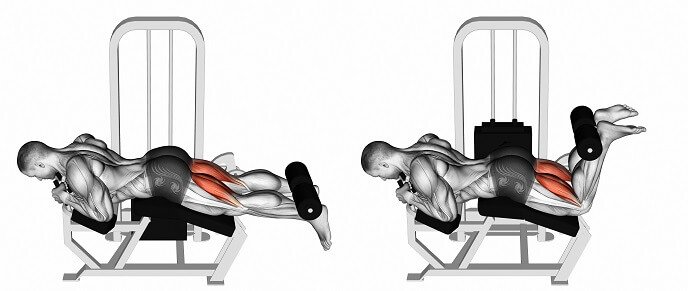
This exercise will decrease your chance of falling and injuries, by improving
the range of motion, flexibility, and balance of the hamstrings. Which
are essential for walking and standing. These are the muscles targeted:
1, BICEPS FEMORIS (LONG & SHORT HEAD)
Located on the outer part of leg.
2, SEMITENDINOSUS
Located in the middle of the leg.
3, semimembranosus
Located on the inner part of the leg.
This exercise isolates and tones the hamstrings. Strong hamstrings are essential for daily activities like walking and running, because they assist with knee flexion and hip extension. Strong hamstrings will lower the risk of knee and lower back injuries. This is a really good isolation and rehab exercise for the hamstrings, and by adding it to your routine complements other compound exercises.
STANDING LEG EXTENSION
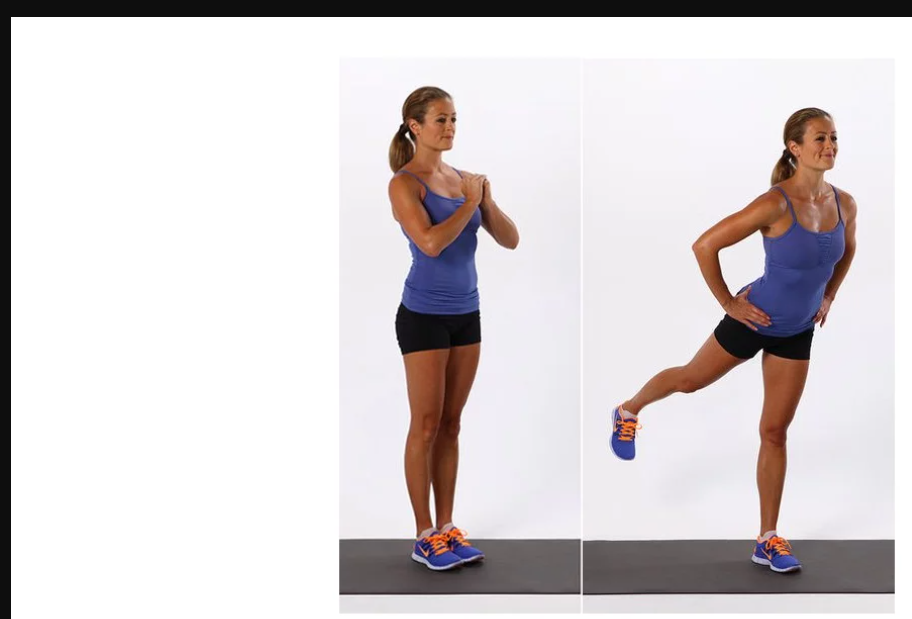
This exercise primarily targets the glutes and helps with improving balance and mobility. These are the muscles worked:
1. GLUTEUS MAXIMUS
This largest gluteal muscle is responsible for stabilizing the hip and assisting with the movement of the back leg.
2. GLUTEUS MEDIUS AND MINIMUS
These two muscles help stabilize the hip to maintain balance, especially when performing a single-leg raise.
3. HAMSTRINGS
These muscles assist in extending the hip, and are located at the back of the thigh.
This exercise is very good for strengthening the gluteus maximus. Strong glutes improves hip movement and stability. Which is good for functional activities like walking, bending, climbing stairs and jumping. It also reduces injuries of the lower back by strengthening the pelvis. It improves your overall balance and proprioception, because balancing on one leg by engaging the core, hip stabilizers, and ankle stabilizers. It’s a very gentle exercise on the joints for seniors and those recovering from injuries.
SEATED MARCHING
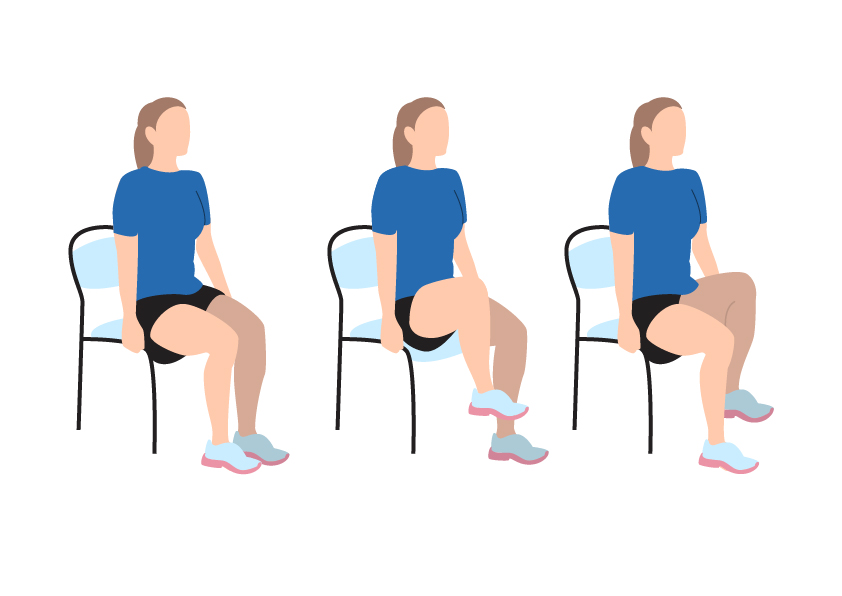
Don’t believe because this exercise is done from a seated position your muscles isn’t being worked, the constant movement and contracting of the leg muscles will improve muscle strength, flexibility, and stability. It can help reduce knee pain while making them stronger. The following muscles are
targeted:
Primary Muscles:
1. HIP FLEXORS (iliopsoas, Rectus Femoris, Sartorius)
Lifting the knees will engage your hip flexors, which are essential for walking.
2. QUADRICEPS
These are four muscles located on the front of the thigh that are engaged when you lift and lower the leg,
3. CORE (ABSDOMINALS & OBLIQUES)
These muscles help in maintaining your posture during the movement.
Secondary Muscles:
4. GLUTES (GLUTEUS MEDIUS, MINIMUS, MAXIMUS)
Helps in controlling leg movement and stabilizing the hip.
5. HAMSTRINGS
These muscles assist in the downward motion of the leg, as it returns
to the seated position.
This exercise is good for seniors, individuals with mobility challenges, and recovering from injury. It can help improve hip mobility, engages the core for better posture, enhances circulation for people with limited mobility and builds lower body endurance and strength.
WALL SLIDES
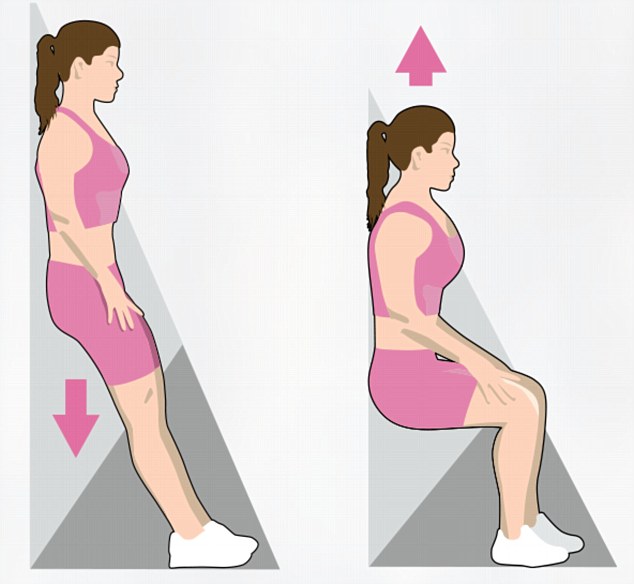
This is good for your quads, glutes, calves and building strength in the leg muscles. It also improves body posture and hip mobility. These are the leg muscles activated:
1. QUADRICEPS
A. RECTUS FEMORIS
This is the middle muscle of the quads that assist with hip flexion.
B. VASTUS LATERALIS
The outer part of the thigh.
C. VASTUS MEDIALIS
The inner part of the thigh.
D. VASTUS INTERMEDIUS3
This muscle is found below the rectus femoris, between the vastus lateralis
and vastus medialis.
The vastus medialis oblique (VMO) is the primary muscle targeted in the thighs.
2. GLUTEUS MAXIMUS
Helps with hip control and overall posture during the movement.
3. HAMSTRINGS
They serve as stabilizers when lowing into and rising out of the squat position.
4. HIP ADDUCTORS (inner thigh)
These muscles on the inner thigh help to stabilize the legs.
5. CALVES (GASTROCNEMIUS & SOLEUS)
They stabilize the foot and ankle during the descent and hold position.
This exercise is good for strengthening the knees because it activates the vastus mediaiis oblique (VMO), which plays a role in preventing knee injuries like patellar tracking disorders. They can improve squats, lunges, and daily movements. It’s a joint-friendly low-impact rehab exercise that avoids high impact, while providing strength building benefits. It engages the abdominals and lower back to maintain posture and support the spine during the hold. They can be done anywhere, and are a simple addition to home workouts or warm-ups.
| ARMS | |||||||||
| FOREARMS | |||||||||
| 1. We use them in many exercises. | |||||||||
| A. Bench Press | |||||||||
| B. Deadlift | |||||||||
| C. Barbell rows | |||||||||
| 2. Stronger forearms leads to a stronger grip. | |||||||||
| 3. You can squeeze harder, engage more muscles, and generate more force. | |||||||||
| 4. Weak forearms can limit how hard you’re able to train other body parts. | |||||||||
| TRICEPS | |||||||||
| 1. Rope push-downs works the lateral head. | |||||||||
| 2. They respond with a higher rep between 12-15. | |||||||||
| 3. Do unilateral and bilateral exercises. | |||||||||
| 4. End your routine with dips. | |||||||||
| BICEPS | |||||||||
| 1. They respond best w/ four exercises of 12 sets. | |||||||||
| 2. Free weights are the best. | |||||||||
| 2. They respond with a higher rep between 10-15. | |||||||||
| 4. Do unilateral and bilateral exercises. | |||||||||
| EXERCISE | |||||||||
| 1. Work triceps and biceps on the same day. | |||||||||
| 2. alternating exercises between the two muscles | |||||||||
| 3. Don’t go heavy | |||||||||
| 4. Just try to fill your muscles with blood | |||||||||
| CONCENTRATION CURL | |||||||||
| 1. Don’t go to heavy. | |||||||||
| 2. Squeeze and focus at the top of the lift. | |||||||||
| 3. Bring the pinkie side up to work the peak. | |||||||||
| HUMMER CURL | |||||||||
| 1. Gives the arm added thickness when viewed hanging from the front. | |||||||||
| 2. It adds more details to biceps. | |||||||||
| ELBOW JOINT | |||||||||
| Why: | |||||||||
| 1. Engages the muscles of the biceps, triceps, and forearm. | |||||||||
| 2. The elbow joint is crucial in building strong, powerful, and functional arms. | |||||||||
| What it does: | |||||||||
| 1. The elbow is a hinge joint. | |||||||||
| 2. This joint is involve in the flexion and extension of the humerus. | |||||||||
| What muscles it works: | |||||||||
| 1. The biceps flex the elbow and supinate the forearms. | |||||||||
| 2. The triceps extend the forearms. | |||||||||
| How to work it: | |||||||||
| Bicep Curls, Triceps Extensions, Chin-Ups, Push-Ups, and Dips | |||||||||
| Tips: | |||||||||
| The arms are a pretty good indicator of over all fitness. | |||||||||
| BICEPS ATTACHMENTS | |||||||||
| 1. EZ-CURL BAR | |||||||||
| A. The neutral grip works the long head. | |||||||||
| B. the EZ bar causes less stress on the wrists. | |||||||||
| 2. STRAIGHT BAR | |||||||||
| A. This bar causes you to use a close grip. | |||||||||
| b. Which works the outer head | |||||||||
| 3. D-HANDLE | |||||||||
| A. The d-handle provides constant tension on the muscle. | |||||||||
| 4. ROPE | |||||||||
| A. The neutral grip works the outer head. | |||||||||
BRACHIALIS
1. This muscle lies beneath the biceps.
2. If you build your brachialis it pushes up your biceps.
3. Given your arms that peak.
The best exercisers to improve your brachialis
1. Over Head Cable Curl
2. Spider Curl
3. Incline Dumbbell Hammer Curl
4. Reverse Low Cable Curl
GROWING PAINS
So, you’re doing your curls and extensions to grow your arms, but not going anywhere. You’re focusing to much on them, and need to strengthen your weak spots.
Here are the fix:
1. CALL IN THE REINFORCEMENTS
You need to recruit bigger muscles to overload your arms,
Your arms plays a part in all upper body exercisers.
When you do a chin-up for your back, you biceps comes in play.
Which means you’re pulling more weight then your would a dumbbell curl.
Target the triceps the same way by doing close-grip bench press.
You’re able to load more weight on the the triceps.
These mult-joint exercisers help your biceps and triceps lift more weight.
Trust me, you will see a difference
2. RESTORE YOUR CORE
Pick you heaviest weight and do ten triceps pushdowns on one leg. You won’t be able to do all ten reps. The problem has nothing to do with your strength, you just lost some of your core base. A weak or unstable core limits how your central nerve system controls your muscles. This will cause your arms power and strength to become limited. When you develop your abs you’re creating a firm base that helps to build bigger arms.
ELBOW PAIN
You can spot and treat these common elbow aches and pains at home.
WHAT IT COULD BE:
Inflammation of the lateral elbow tendon could be tennis elbow. If the inflammation is on the medial tendon you could have golfer’s elbow. Any activities that involves the elbow could lead to these conditions, like swinging a racket, bat, club, or throwing a softball.
DIY TREATMENT:
Take a pain reliever, ice your elbow, stabilize the tendons with a brace, and ease back into your daily activities.
VISIT THE OFFICE:
If you can’t rotate your palm up and down , move your elbow normally, or have severe swelling and bruising at the joint.
BICEPS CURL
If you want to put muscle on your upper arms. This is the go to exercise. It also targets the forearms , deltoids, and other shoulder muscles.
LATERAL RAISE
This is one of the most effective exercises to hit the medial (lateral) deltoids, which are the muscles on the sides of the shoulders. The trapezius and rotator cuff muscles are also targeted.
UPRIGHT ROWS
This exercise increases strength in the upper arms, giving you the ability to lift heavier loads. It targets the front and back muscles of the shoulders. The deltoids, bicep brachii, trapezius, and rhomboids are all targeted. If you have any shoulder injury, lateral and front raises can be done as alternatives to work similar muscle groups.
TRICEPS EXTENSION
This exercise hits the muscles in the back of the upper arms. The triceps is a three-headed muscle, consisting of the:
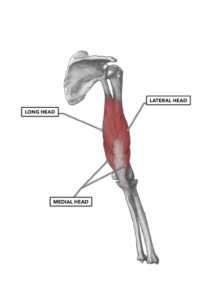
LATERAL HEAD
This head is located on the outer side of the arm. It assist in the width and development of the triceps.
MEDIAL HEAD
This head can be found beneath the lateral head, closer to the inner side of the arm.
LONG HEAD
This head runs along the back of the hands. It is responsible for the overall mass and shape of the triceps.
RESISTANCE BAND LAT PULLDOWN
This exercise works the entire upper body in the front (biceps and forearm), and back (lats, rear deltoids, rhomboids, and trapezius). The core muscles are also engaged.
WALL PUSH-UPS
This exercise concentrates on the arms since you’re standing up, but they also hit other muscles:
PECTORALIS MAJOR
This muscle is found in the chest. The wall push-up develops the upper and middle chest.
DELTOIDS
The anterior (front) deltoids of the shoulders are engaged with this exercise.
TRICEPS BRACHII
This exercise is great for strengthening and toning the triceps. The triceps extends the elbow during the push-up motion.
FINGER BENDS
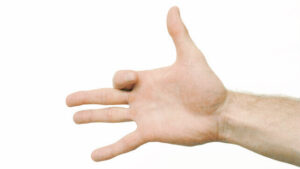
This is a simple exercise that helps to prevent deterioration of joints in your fingers. It helps to improve hand strength, dexterity, and overall hand function. The following muscles that are targeted include:
FLEXOR DIGITORUM PROFUNDUS
This muscle runs along the forearm and attaches to the bones at the tips of your fingers. It helps with flexing the fingers at the middle and distal joints.
FLEXOR DIGITORUM SUPERFICIALIS
This muscle runs along the forearm and attaches to the middle bones of the fingers. It helps with flexing the fingers at the proximal and distal joints.
LUMBRICAL MUSCLES
These muscles are found in the palm of the hand and connect to the tendons of the flexor digitorum profundus. They help with flexing of the fingers at the interphalangeal joints and assist in finger bending and grip strength.
INTEROSSEI MUSCLES
These muscles are found between the bones of the hand. The assist in finger flexion and adduction (bringing the fingers closer together),
FLEXOR POLLICIS LONGUS
This muscle help with flexing of the thumb at the interphalangeal joints
and assist with overall hand and finger function.
MAKE A FIST
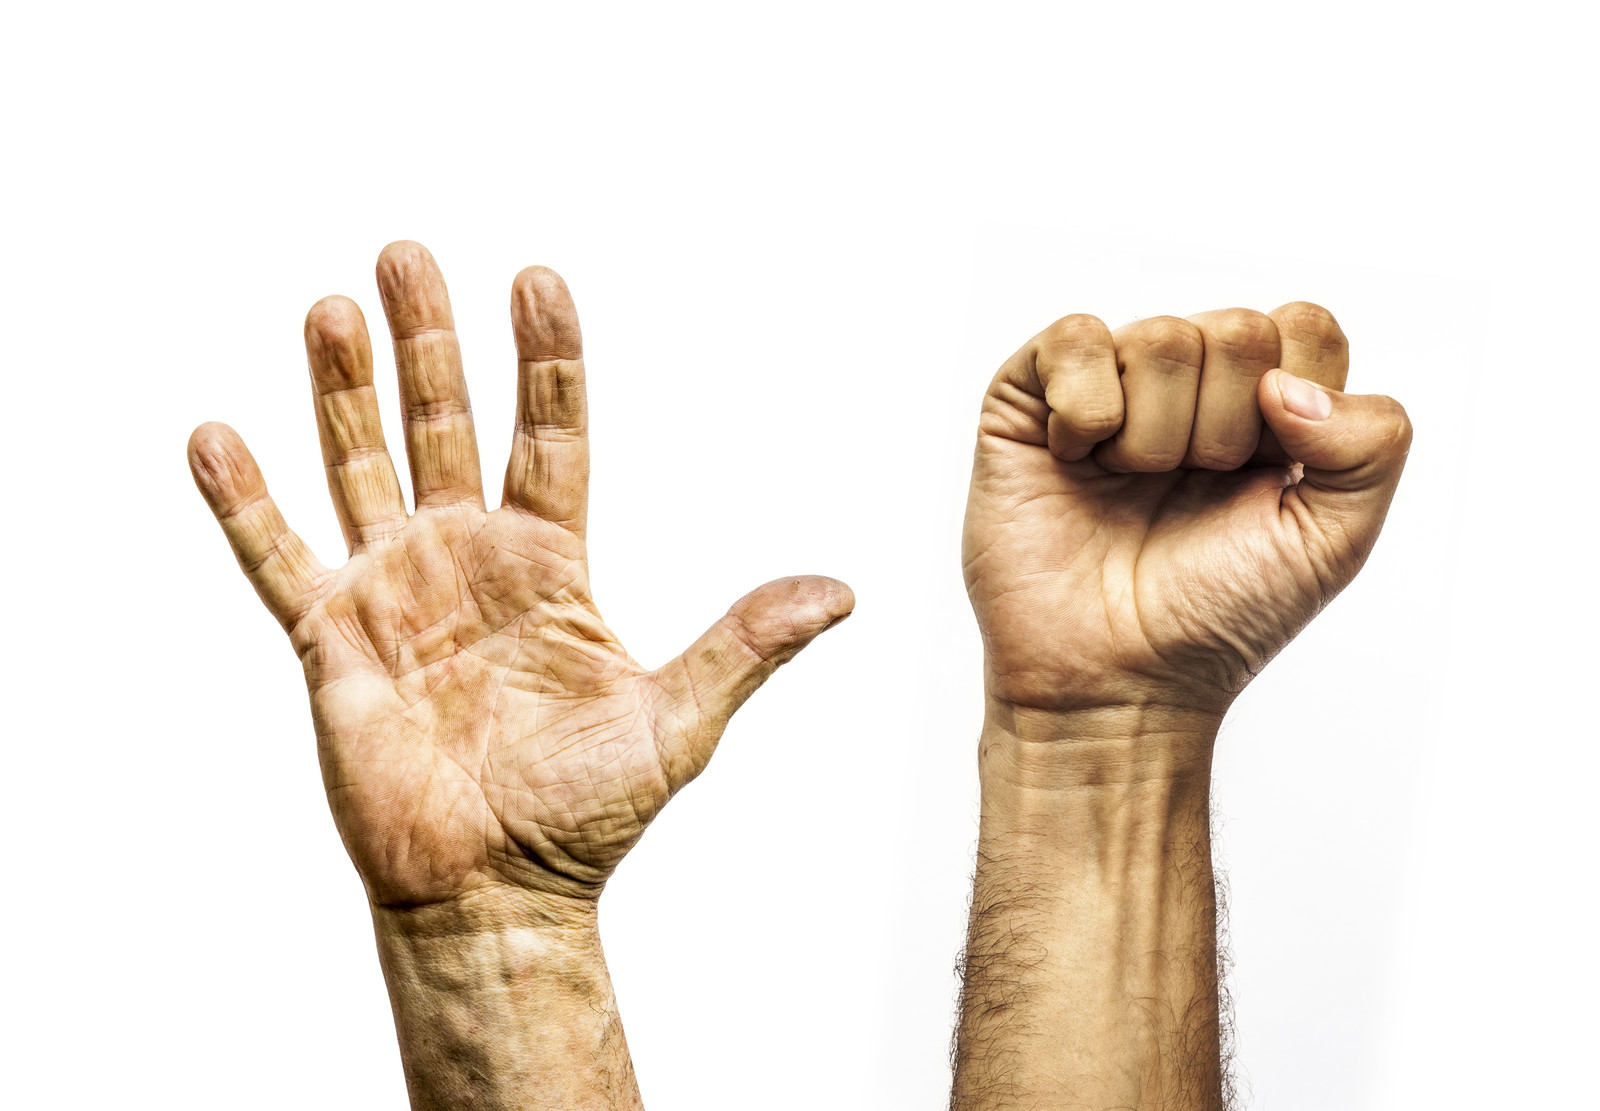
This is good for increasing your range of motion and pain relief simultaneously.
FLEXOR DIGITORUM PROFUNDUS AND SUPERFICIALIS
These muscles assist in flexing the fingers and curling them into a fist. The digitorum profundus flexes the joints closest to the fingertips, while the flexor superficialis flexes the joints in the middle of the fingers.
FLEXOR POLLICIS LONGUS
This muscle assist in the flexing of the thumb., allowing it to wrap around the fingers when making a fist.
PRONATOR TERES
This muscle helps in the pronation of the forearm. This is the motion of turning the palm downward when making a fist.
PALMARIS LONGUS (OPTIONAL)
We all don’t have this muscle, but if you do, it helps with wrist flexion and strength of your grip when making a fist.
EXTRINSIC HAND MUSCLES
This muscle is in the palm and connect your hand to your forearm. They play a role in controlling the fine movements of the fingers and are essential for making a fist.
MAKE A “C” WITH FINGERS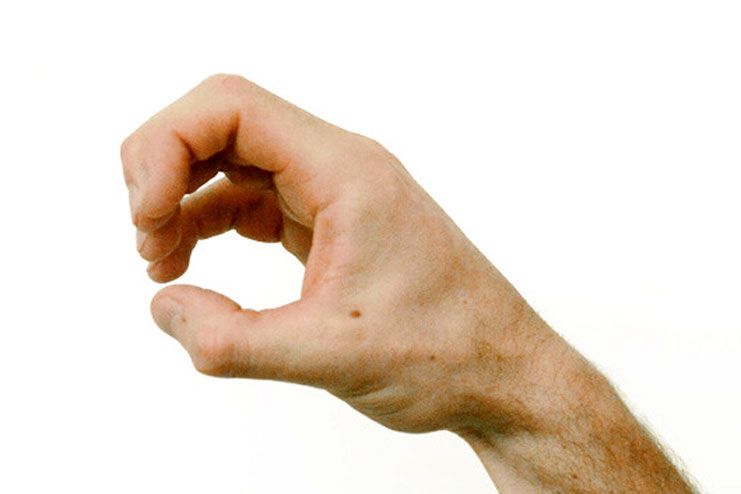
FLEXOR DIGITORUM PROFUNDUS
This muscle runs along the forearm and attaches to the bones at the tips of your fingers. It helps with flexing the fingers at the middle and distal joints.
FLEXOR DIGITORUM SUPERFICIALIS
This muscle runs along the forearm and attaches to the middle bones of the fingers. It helps with flexing the fingers at the proximal and distal joints.
FLEXOR POLLICIS LONGUS
This muscle assist in the flexing of the thumb., allowing it to wrap around the fingers when making a fist.
THUMB BENDS
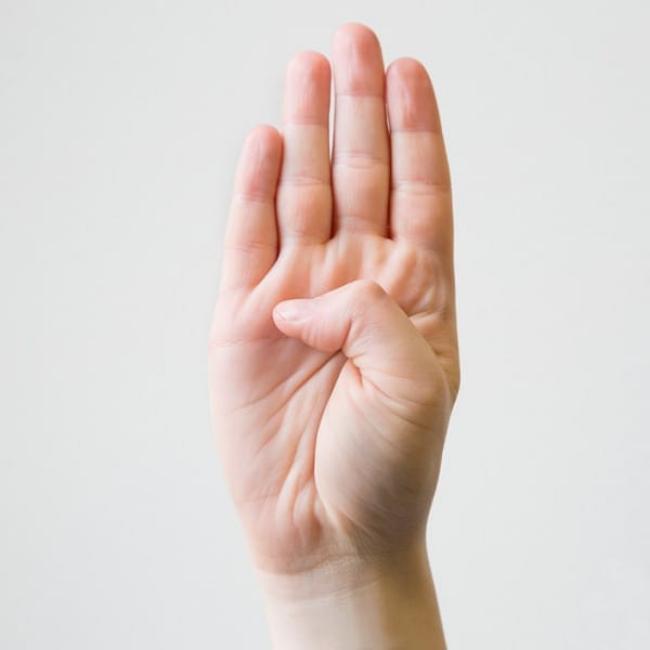
FLEXOR POLLICIS LONGUS
This muscle help with flexing of the thumb at the interphalangeal joints
and assist with overall hand and finger function.
FLEXOR POLLICIS BREVIS
This muscle contributes to the flexion of the thumb.
FINGER LIFTS
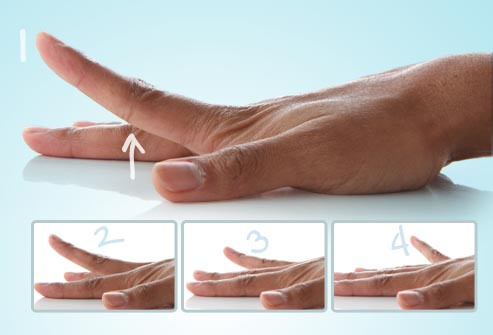
This exercise helps in strengthening the hands and fingers. Which improves the flexibility and mobility level by expanding your range of motion. The following muscles involved in finger lifts include:
1. FOREARM MUSCLES:
EXTENSOR MUSCLES
These muscles are responsible for extending the fingers. These muscles are on the back
of the forearm and are involved in lifting the fingers against resistance.
FLEXOR MUSCLES
These are flexor muscles, located on the underside of the forearm, and are responsible for flexing
the fingers. They come into play when your resist the movement and lower your fingers back down.
2. INTRINSIC HAND MUSCLES
These small muscles are found within the hand. They are responsible for fine motor movements of the fingers and are engaged during activities that require precise control of finger movements, such as lifting of the fingers.
WRIST STRETCH
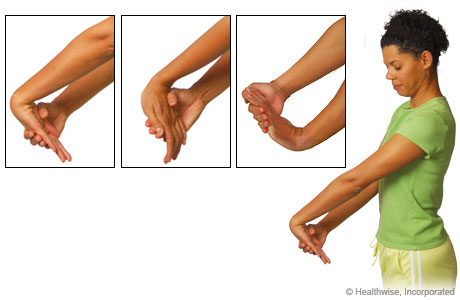
If you want to limit pain, weakness, stiffness, improve flexibility, and prevent injuries related to overuse or repetitive strain, such as typing, writing, or sports like golf and tennis. You should start stretching your wrist. The muscles targeted can vary depending in which direction the wrist is being stretched, but generally include:
1. FOREARM MUSCLES:
EXTENSOR MUSCLES
These muscles are responsible for extending the fingers. These muscles are on the back of the forearm and are responsible for extending the wrist and fingers.
FLEXOR MUSCLES
These are flexor muscles, located on the underside of the forearm, and are responsible for flexing the fingers and wrist.
2. INTRINSIC HAND MUSCLES
These small muscles are found within the hand. They are responsible for fine motor movements of the fingers and are engaged during activities that require precise control of finger movements, such as finger motions.
3. WRIST MUSCLES
These are muscles that span the wrist joint and are responsible for extending and flexing the wrist.
4. Tendons
The wrist joint has tendons that connect muscles in the forearms to the fingers and hand. They assist in wrist movement and stability.
GIVE THE OKAY

This exercise is good for reducing arthritis pain, strengthening muscles, and improving dexterity in the hand and fingers. The muscles involved include:
1. FLEXOR DIGITORUM PROFUNDUS AND SUPERFICIALIS
These muscles allows you to bend your fingers to form an “O” shape, by flexing the fingers at the joints.
2, LUMBRICAL MUSCLES
These muscles are involved with fine motor skills and bending of the fingers.
3. INTEROSSEI MUSCLES
These muscles are involved in various hand movements, including spreading and closing of the fingers.
4. ABDUCTOR POLLICIS BREVIS
These muscles are involved in moving the thumb away from the hand.
5. OPPONENS POLLICIS
This muscle allows the thumb to cross the palm to touch the fingers.
6. FLEXOR POLLICIS BREVIS
This muscle helps in flexing the thumb to make the circle shape, by bring the thumb towards the fingers.
FINGER ABDUCTION
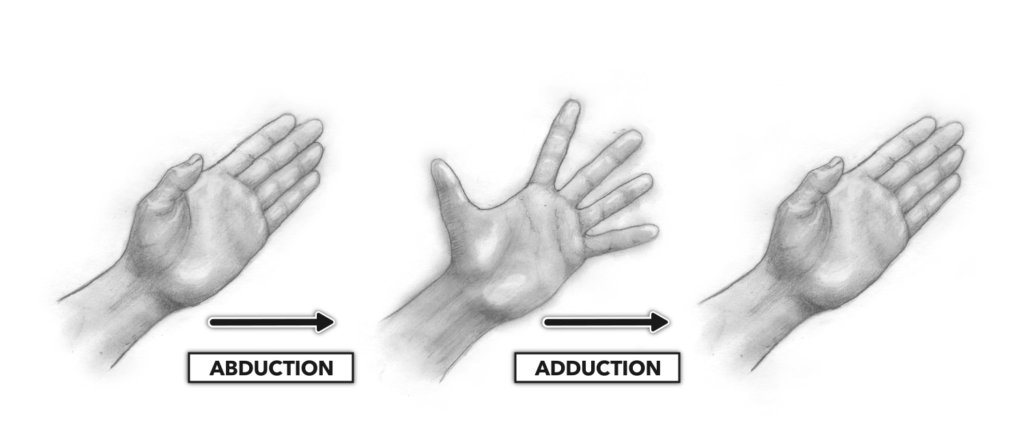
This exercise hits the muscles between the fingers. It will help improve the flexibility and mobility of the fingers.
1. DORSAL INTEROSSEI
These muscles assist in the abduction of the fingers (spreading them apart), and in the flexing and extension of the fingers.
2. PALMAR INTEROSSEI
These muscles assist in the abduction of the fingers (spreading them apart), and in the flexing and extension of the fingers.
3. ABDUCTOR DIGITI MINIMI
This muscle allows you to abduct the pinky finger away from the other fingers.
4. LUMBRICAL MUSCLES
These muscle is primarily involved in the flexion and extension of the fingers, but these muscles also helps which abduction of the fingers when they are in a flexed position.
HAND OPEN/CLOSE

This exercise helps to loosen up tight fingers and increase strength in the fingers. These muscles that are responsible for the opening and closing of the hand are found in the hand.
FLEXOR DIGITORUM SUPERFICIALIS
This muscle runs along the forearm and attaches to the middle bones of the fingers. It helps with flexing the fingers at the proximal and distal joints.
FLEXOR DIGITORUM PROFUNDUS
This muscle runs along the forearm and attaches to the bones at the tips of your fingers. It helps with flexing the fingers at the middle and distal joints.
These muscles are responsible for the flexion (closing) of the hand.
EXTENSOR DIGITORUM
This muscle extends the fingers at the metacarpophalangeal (MCP) and interphalangeal (IP) joints.
EXTENSOR INDICIS
This muscle extends the index finger.
EXTENSOR DIGITI MINIMI
This muscle extends the pinky finger.
These muscles are responsible for the extension (opening) of the hand.
THUMB FLEXIONS
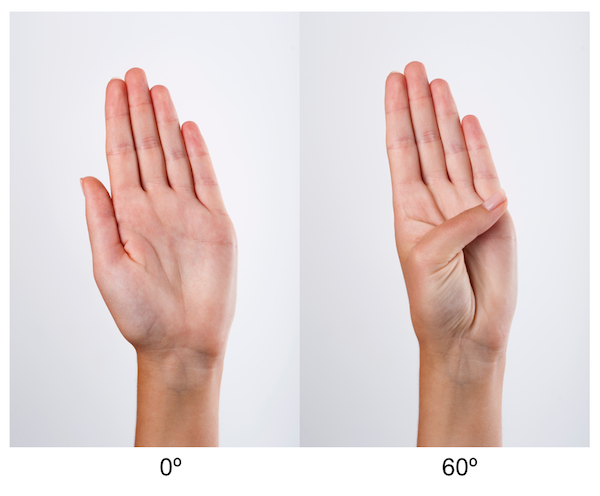
This exercise is done to increase mobility, strength, and flexibility of the thumb. The muscles is responsible for this movements are:
1. FLEXOR POLLICIS LONGUS
This muscle help with flexing of the thumb at the interphalangeal joints
and assist with overall hand and finger function.
2. FLEXOR POLLICIS BREVIS
This muscle contributes to the flexion of the thumb.
3. ABDUCTOR POLLICIS BREVIS
These muscles are involved in moving the thumb away from the hand.
4. OPPONENS POLLICIS
This muscle allows the thumb to cross the palm to touch the fingers.
ELBOW FLEXION

Elbow flexion is important for lifting things. This exercise helps in improving your elbow’s range of motion. Which allows you to fully bend your elbows. The following muscles are targeted:
1. BICEPS BRACHII
This muscle is found on the upper front portion of the arm, and what men and women go crazy over.
2. BRACHIALIS
This muscle is beneath the biceps brachii. When develop they lift the biceps brachii, making them appear larger.
3. BRACHIORADIALIS
This muscle runs along the side of the forearm, and gets worked when a neutral grip is used.
ELBOW PRONATION
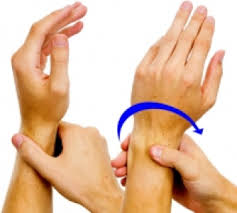
As we age elbow pain tends to develop limiting the ability to rotate the forearm. We need motion of the forearm to be able to pour a glass of water and pickup objects. These muscles are responsible for this movement:
1. PRONATOR TERES
This muscle helps in pronation and flexion of the forearm.
2. PRONATOR QUADRATUS
This is a primary muscle for forearm pronation.
3. FLEXOR CARPI RADIALIS
This muscle assists in pronation of the forearm, but is primarily a wrist flexor.
4. BRACHIORADIALIS (to a lesser extent)
This muscle can assist in pronation when the forearm is supinated, but is primarily a flexor of the elbow.
| CHEST | ||||||||
| INNER GROWTH | ||||||||
| 1. A wide grip is better for activating the inner and outer chest. | ||||||||
| 2. A WG provides overall thickness. | ||||||||
| 3. The pecs have two heads. | ||||||||
| 4. They originate alone the sternum (inner) and the medial half of the clavicle (outer). | ||||||||
| 5. The heads are the sternocostal head and clavicle head. | ||||||||
| OUTER GROWTH | ||||||||
| 1. The medial half of the clavicle is the outer chest. | ||||||||
| 2. Dips are the best exercise for hitting the outer chest. | ||||||||
| 3. They are like squats for the upper body. | ||||||||
| 4. They should be down early in the workout. | ||||||||
| A. Alternative Exercises | ||||||||
| 1. Decline Bench | ||||||||
| 2. Cable Flye | ||||||||
| 3. Decline Press | ||||||||
| HOW TO IMPROVE | ||||||||
| 1. Do bench presses, dips, and dumbbells flyes. | ||||||||
| 2. Work all three angles – flat, incline and decline. | ||||||||
| 3. In order to emphasize on the pecs, alter your range of motion. | ||||||||
| 4. By doing half reps to avoid locking out at the top targets the pecs more. | ||||||||
| 5. To compensate for the shorter ROM, you must do 5-7 sets. | ||||||||
| 6. Do weighted dips with a full range of motion | ||||||||
| 7. Hinge your hips forward to target the pecs. | ||||||||
| 8. When doing flyes focus on a long controlled ROM, and a rep range between 10-15. | ||||||||
| UPPER CHEST | |||||||
| The best exercisers to improve your upper chest. | |||||||
| 1. 60-degree Incline Dumbbell Press | |||||||
| 2. Smith Machine Bench Press (TO CLAVICLES) | |||||||
| 3. Dumbbell Pullover | |||||||
| 4. Low Cable Crossover | |||||||
| TWEAK TO GROW CHEST | |||||||
| DUMBBELL PULLOVER | |||||||
| TWEAK: | |||||||
| Just change your elbow angle. | |||||||
| HOW TO DO: | |||||||
| To get a real pump in you pecs, bend your elbows to about 90 degrees. | |||||||
| As you lower the weight down towards the floor, feel the rib cage stretch. | |||||||
| Use your pecs to raise the weight back over your chest. | |||||||
| WHY: | |||||||
| The elbow angle will improve your pecs. |
A MINOR DIP
We all have worked on our pec major, but what about the muscle below your pec major. This is the smaller muscle found below the pec major, but is very important in chest growth. You can hit this muscle by doing pec-minor dips.
HOW TO DO IT:
1. Hold yourself over parallel bars.
2. Position your hands just outside shoulder width.
3. Keeping your elbows straight, lower your body towards the floor.
4. You should feel a stretch in your chest.
5. Squeeze your pecs and spread your shoulders to reverse the move.
BENCH TECHNIQUES
The number one exercise for upper-body strength is the bench press. Use these techniques to set a PR.
1.HAVE A SPOTTER
On the day you decide to go for it, please have a spotter for your own safety.
A spotter can also help you rack and unrack the bar.
2. THE STANCE
A strong base is needed to hit your PB. keep you feet flat on the floor.
if your feet are in front your knees, you base will be weaken.
If they are too far back, your heels will raise off the floor, weakening your base.
I see this move all the time, where people feet are on the bench or up in the air.
This just weakens your bench press
3. HAND PLACEMENT
Your shoulder width will determine your grip width off the bar.
If your grip is to wide to much pressure will be placed on the shoulders.
If your grip is to narrow your triceps will be worked more then your chest.
The perfect grip to hit you chest is when your forearms are vertical to the floor.
4. KEEP A NATURAL ARCH
I watch these ridiculous back arches online. This can reduce your range of motion, and compress your spine. When you lay on the bench, your back has a natural curve. Which puts you in your strongest position.
5. STAY TENSE
Tense your upper back by squeezing your shoulder blades, before you unrack your lift. Press your upper back against the bench, and keep your shoulders down. If you raise your shoulders it lengthens your range of motion.
By flexing the upper back and shoulders down, your chest will be maximally elevated. This will shorten your range of motion.
6. UNRACKING THE BAR
A lot of lifters don’t know the importance of how to unrack the bar.
You should position yourself so you need to move the bar no more than a few inches, just enough to clear the supports. Lift the bar off the rack by slightly straightening your bent arms. Make sure your chest is directly under the bar.
It’s always best to have a spotter.
7. BREATHING
on the lift exhale.
As you lower the bar exhale
MEDICINE-BALL SQUEEZE PRESS
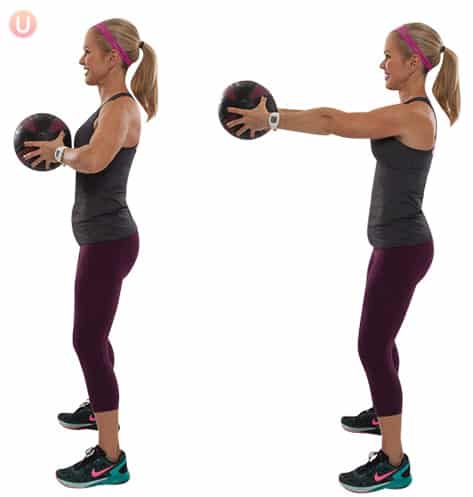
This exercise is good for building and strengthening the pectoralis major. These are the large chest muscles responsible for all pushing motions. These are the muscles targeted during this exercise:
1. PECTORALIS MAJOR (Main Chest Muscle)
This muscle is activated in the chest press, and helps in pushing the ball away
from the chest.
2. ANTERIOR DELTOID (Front shoulder)
These come into play during the pressing movement. They help in lifting and stabilizing the arms.
3. TRICEPS BRACHII (Back of the Arm)
The triceps extend the elbows as you press the ball away from the chest.
4. SERRATUS ANTERIOR
This muscle gets activated when the shoulders move, helping with scapular stability.
5. CORE MUSCLES
The rectus abdominis and obliques muscles stabilize the torso and maintains
proper posture during the press, especially when performing still exercise
on a stability ball or with feet elevated
This exercise is used as functional training to improve muscle coordination, balance, and endurance.
BARBELL CHEST PRESS
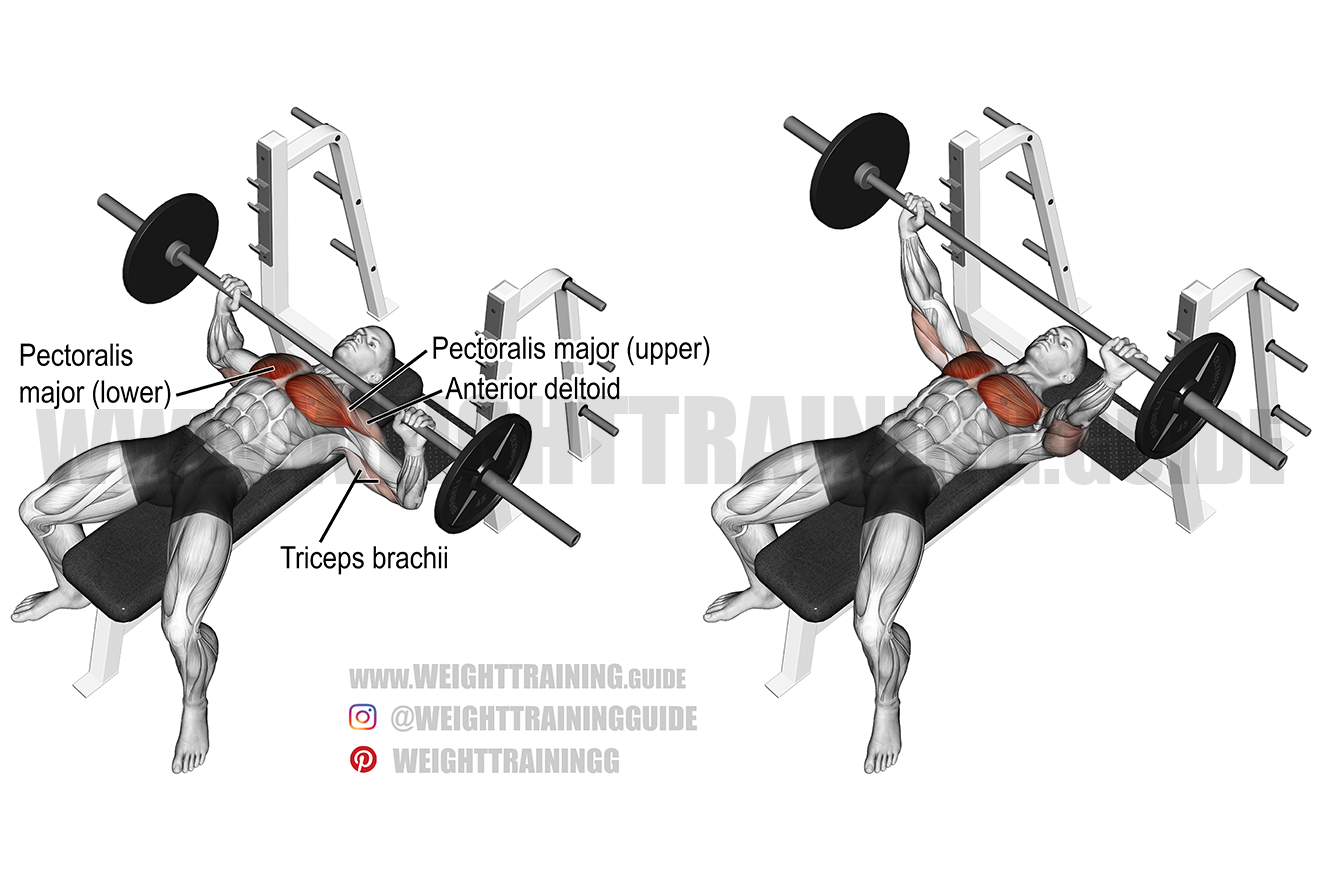
This exercise is good for building and strengthening the pectoralis major. These are the large chest muscles responsible for all pushing motions. These are the muscles targeted during this exercise:
1. PECTORALIS MAJOR (Main Chest Muscle)
This muscle is activated in the chest press, and helps in pushing the bay away
from the chest.
2. ANTERIOR DELTOID (Front shoulder)
These come into play during the pressing movement. They help in lifting and stabilizing the arms.
3. TRICEPS BRACHII (Back of the Arm)
The triceps extend the elbows as you press the bar away from the chest, and helps
with the pressing motion.
4. SERRATUS ANTERIOR (Side of Rib Cage)
This muscle gets activated when the shoulders move, helping with scapular stability.
5. BICEPS BRACHII (Front of Arms)
These muscles play a very minimal role, but they help in stabilizing the arms during the pressing motion.
The pectoralis major does most of the work, but these other muscles work together to assist in preforming the chest press.
| ABS | ||||||||
| CRUNCH TIME | ||||||||
| 1. The abs are made up of four muscles: | ||||||||
| A. Rectus abdominis | ||||||||
| B. External oblique | ||||||||
| C. internal oblique | ||||||||
| D. Spinal erectors | ||||||||
| 2. Do the reps at a fast pace. | ||||||||
| 3. This will increase the activity in all for muscles. | ||||||||
| 4. The rectus abdominis gets hits the hardest when doing crunches at a slow pace. | ||||||||
| 5. The increase speed will make the other three muscles work harder especially the external obliques. | ||||||||
| 6. Keep the rest period short between sets. | ||||||||
| SMALL WAISTED | ||||||||
| 1. The bodybuilders of today know nothing about maintaining a small midsection. | ||||||||
| 2. One way to control your waist size is by doing no weighted abs exercises. | ||||||||
| 3. Don’t do any weighted crunches or side bends. | ||||||||
| 4. This makes the abs muscle to thick particularly the obliques. | ||||||||
| TURKISH GETUP | ||||||||||||||||||
| 1. The TGU is a great exercise for the abs, but if your form sucks… | ||||||||||||||||||
| A. These are the things you’re looking for: | ||||||||||||||||||
| I. Positing | ||||||||||||||||||
| Do lay down with the weight in your hands. Lay on your side and grasp the weights with both hands, pull it close to your chest, and roll onto your back. | ||||||||||||||||||
| II. Arm placement | ||||||||||||||||||
| If you nonworking arm is to close to your body, your balance will be thrown off. Keep your arm on the ground angled roughly 45 away from your body. | ||||||||||||||||||
| III. Don’t roll | ||||||||||||||||||
| Don’t reach across your body with the weight to raise up off the ground. | ||||||||||||||||||
| You need to contract your abs to prop yourself off your back onto your hand. | ||||||||||||||||||
| IV. Big toe | ||||||||||||||||||
V. Watch the weight You should never look away from the weight. This will help with balance throughout movement |
||||||||||||||||||
|
||||||||||||||||||
SIX-PACK DOS AND DON’TS
So, you say you want to build killer abs.
Then follow these dos and don’ts to see your six-pack
1. DON’T TARGET YOUR ABS
You read that right, the worst exercise for a flat stomach are crunches.
Their will fuck up your lower spine.
2. DON’T START WITH CRUNCHES
Crunches and sit-ups makes you flex your spine, which rounds your lower back.
you want to do exercises that allows you to transfer force from your lower to upper body.
Include exercises that works the hip, lower-back, and core muscles.
It would be better to do pushups. mountain climbers, or side planks.
3. DON’T SPEND TO MUCH TIME ON ABS
If you do 2-3 exercisers with 2 -4 sets it revs up your core muscles for your weight training session.
4. DO WORK ALL MUSCLES
When you do three full-body workout a week your metabolism stays elevate all the time.
When your muscles contract it burns calories, and 48 hours later as you’re recovering your expending more energy to repair them.
Weight loss will be achieved because of constant use of energy.
Muscle is the body’s primary fat burner.
If you really want to see your abs, then do a two week legs session.
Leg day burns more calories than an upper-body weights day.
5. DO START WITH CORE EXERCISES
If you start your workout with core exercises when you’re fresh your strength will increase overall.
If your core is strong then you’re able to move more weight.
Which causes you to use more muscles, and burn more calories.
INVISIBLE ABS
You’re working your abs and seeing no results, then here is what your doing wrong.
1. SLEEP
The less sleep you get the more calories are eaten.
Shot for 8 hours of sleep per night.
2. SNACKING
When your snack becomes a meal Houston there’s a problem.
If your snack doesn’t fit in your hands you’re over eating.
Snacks are to crush you cravings.
3. DRINK LESS
50% of your daily calorie intake comes from soda and fruit juice.
Drink water, coffee, and tea.
Don’t drink anything with artificial sweeteners, it just increases your cravings.
4. EAT THE FAT
Healthy fats will lean out your body.
About 20-35% of your daily calories should come from fats.
You should eat beef, pork, poultry, eggs, and fatty fish.
5. EAT MORE FISH
Omega-3 fatty acids is known to burn fat and help in muscle gain.
It helps in the process of lowing cortisol. a hormone that causes the body to store fat.
Take 2-3 grams of fish oil daily by supplement or food.
6. EAT REAL FOOD
Don’t eat any foods with the word “low” in it.
They can have you craving and overeating,
You want to eat whole, unprocessed foods.
These are the foods you find on the perimeter of your grocery store.
7. LIFT HEAVIER
The stronger you get the more weight you can move.
This increases muscle gains, and burns more calories.
Which leads to a leaner body.
Heavy lifting also helps to increase your sleeping metabolism.
8. HOLD YOURSELF ACCOUNTABLE
I hate when people say what their want to do, put has no plan of how to do it.
The first thing you need is a pen and paper.
You’re going to write down that you want a six-pack.
Then your going to take pictures and measurements of yourself.
Next, establish a reasonable time to reach your goal.
When you reach that time, you then re-access your evaluation.
By writing out your plan, you’re holding yourself accountable.
9. PROTEIN TO LEAN
Muscles are built in the gym, but abs are built in the kitchen.
If you want to see abs you must lower your body fat.
This is where protein comes into play, because it helps control blood sugar, keeps you fuller, and reduce hungry
It take more energy to digest protein, which burns more calories.
It’s harder for the body to store protein as fat.
RULES TO SIX
You say you’re doing all it takes to get a six-pack. Well, it comes down to diet and exercise, with diet being 80% of the equation. We all have a six-pack waiting to be revealed below our layer of fat. All we need to do is get leaner. These rules will help you get there.
1. DROP CARBS
Limit your intake of processed food.
2. KEEP MOVING
Limit your rest period between sets. this will keep your heart rate elevated, and more calories will burn. Which will lead to more weight loss. You should use more supersets in you workouts.
3. EAT MORE FIBER
We never eat enough fiber, you need to consume about 38 grams per day
4. DRINK
You need to water and coffee. Coffee is known to boost your metabolism.
THE ABS POP
You diet is on point, your body fat is in the single digits, but your abs are lacking pop.
Here’s the reasons why:
1. Train you abs twice a week.
2. Your abs are like any other muscles.
3. Focus more on the stretch and squeeze, by slowing down the rep tempo.
4. Take ever set to failure.
5. Place more attention on the lower abdominal, they tend to be less developed then the upper region.
WORKOUT 1 SETS REPS
TWISTING CRUNCH 2 20-25
HANGING STRAIGHT-LEG RAISE 3 10-15
BICYCLE CRUNCH 4 20-25
All the exercises in this workout are body weight movements. The reps should be on the higher side.
WORKOUT 2 SETS REPS
CABLE CRUNCH 2 13-15
SEATED MACHINE CRUNCH 3 13-15
SIDE CABLE CRUNCH 4 16-20
All the exercises in this workout are weight movements. The reps should be on the lower side.
| BACK | ||||||||
| WIDE LATS | ||||||||
| 1. To get width on your back wide-grip exercisers be done. | ||||||||
| A. Wide-grip pulldown | ||||||||
| B. Wide-grip rows | ||||||||
| C. Close-grip pulldown – Neutral grip. | ||||||||
| PULLDOWNS | ||||||||
| 1. Using a wide grip will open up your clavicles to put less pressure on your rear delts. | ||||||||
| BARBELL ROWS | ||||||||
| 1. You want to get your elbows as high as possible to contract your lats at the top. | ||||||||
| TARGETING THE BACK MUSCLE | ||||||||
| 1. To grow muscle you have to hit the target area with as much tension as possible. | ||||||||
| 2. When it comes to back training we can fail to reach this goal due to secondary muscles fatiguing before the target muscle has been broken down. | ||||||||
| 3. The biceps and deltoids | ||||||||
| 4. You need to isolate the back muscles to get results. | ||||||||
| A. Isometric Squeezes | ||||||||
| 1. Isometric contractions place tension on the target muscle. | ||||||||
| Dumbbell Pullover | ||||||||
| A. Pull the dumbbell over your nose. | ||||||||
| B. Drive your elbows back, and your shoulder blades as closely together as possible and hold the weight for 1-2 seconds. | ||||||||
| C. Squeeze your back as hard as possible. | ||||||||
| D. Remaining static will keep your deltoids out of the picture. | ||||||||
| B. Straight Arms | ||||||||
| 1. These are exercises that eliminate flexion and extension of the arms to isolate the back muscles. | ||||||||
| A. Straight-arm dumbbell pullover or straight-arm pulldown. | ||||||||
| B. These two eliminate flexion in the arm. | ||||||||
| C. Slow down the REP tempo to make the muscles work longer. | ||||||||
| C. Range of Motion | ||||||||
| 1. Altering your ROM gives you different degrees of isolation you can achieve in the target muscle. | ||||||||
| 2. Don’t focus on the full ROM that keeps tension on the target muscle. | ||||||||
| ONE-ARM ROW | ||||||||
| 1. This brings out the lower-lat thickness. | ||||||||
| STOP BACK ROUNDING | ||||||||
| 1. The dead-lift is a crucial move for building back size and strength, but many of us have trouble keeping a straight back. | ||||||||
| 2. This is because you have a weakness. you might be lifting to heavy or lacking mobility. | ||||||||
| 3. if you want to avoid an injury down the line i suggest employing these tips. | ||||||||
| A. GO LIGHT | ||||||||
| 1. Do explosive lifts, to speed up recovery and correct form. | ||||||||
| B. WORK ON MOBILITY | ||||||||
| 1. Lacking mobility limits your ability to reach the bar without rounding your back. | ||||||||
| 2. You can do reps of downward dogs to improve this prove. | ||||||||
| C. STRENGTHEN YOUR LOWER BACK | ||||||||
| 1. You need to do back extensions and good mornings to strengthen your lower back. | ||||||||
| D. RECORD YOURSELF | ||||||||
| 1. You can view your form. | ||||||||
| 2. Record yourself from the side. | ||||||||
| 3. You can assess your form. | ||||||||
| HOW TO IMPROVE | ||||||||
| 1. You can’t do enough pull-ups. | ||||||||
| 2. you need to do many variations. | ||||||||
| 3. Do behind the neck, front, narrow-grip, underhand grip, or a v-par draped over a pull-up bar. | ||||||||
| 4. This way you hit the back muscles from every angle. | ||||||||
| 5. This should be you starting routine exercise. | ||||||||
| MIDDLE BACK | |||||||||
| 1. How to add mass and separation. | |||||||||
| These are the best exercisers to build the middle back. | |||||||||
| 1. WG Bentover barbell row | |||||||||
| 2. Standing High Cable Rope Face Pull | |||||||||
| 3. Smith Machine Behind-The-Back Upright Row | |||||||||
| 4. Bentover Dumbbell Lateral | |||||||||
| 2. All wide-grips exercises hits the mid-back. | |||||||||
| 3. This includes wide-grip pullups, pulldowns, seated cable rows, and barbell rows. | |||||||||
| TWEAK TO GROW BACK | |||||||||
| DUMBBELL PULLOVER | |||||||||
| TWEAK: | |||||||||
| Alter your elbow angle to target lats | |||||||||
| HOW TO DO: | |||||||||
| Start with a slight bend of the elbows, lower the weight down and away from your head. | |||||||||
| In the bottom position you’re straightening your arms away from your head, feeling a stretch in the lats. | |||||||||
| Return the weight just over your forehead. | |||||||||
| WHY: | |||||||||
| You can make this exercise a very useful part of your workout, by sightly altering your technique. | |||||||||
| ONE-ARM DUMBBELL ROW | |||||||||
| TWEAK: | |||||||||
| Lay face down on an incline bench to stabilize your torso as you row. | |||||||||
| HOW TO DO: | |||||||||
| Set the bench at a 45 degree angle, lay your non-working shoulder and pec on the bench, | |||||||||
| wrap your arm underneath the bench to keep the torso locked in place. | |||||||||
| WHY: | |||||||||
| This position will limit the possibility of cheating, but it will give you a longer range of motion. | |||||||||
| The lat also gets a greater stimulation. |
BACK PROBLEMS
These are some problems that can hinder your back size and strength.
1. TIGHTNESS
Sitting in one position over a period of time, like your desk all day will stiffen
up your upper back. Which can lead to poor posture, weak shoulders,
and back and neck pain.
THE FIX:
Do thoracic rotations
2. ROW THE BOAT
the dumbbell row is great for the middle traps and rear shoulders.
The problem is a lot of people lift with just their arms.
THE FIX:
Do a two-part dumbbell row by first pulling your shoulders back, and hold the position.
next, pull the dumbbell to your chest with your elbows pointing outward.
This forces you to use your shoulder blades.
3. TOP HEAVY
If your upper traps are stronger than the middle and lower section,
It can cause a condition known as shoulder impingement.
This is when the muscle in your rotator cuff become pinched by your shoulder joint.
THE FIX:
Cable diagonal raise
LOWER BACk ACHES AND PAINS
You can spot and treat these common back aches and pains at home.
WHAT IT COULD BE:
Piriformis syndrome (a tight butt muscle) or a herniated disk. They both put pressure on the sciatic nerve in the back. We don’t know what causes piriformis syndrome, but a herniated disk occurs due to improper lifting techniques or sports that involves rotating of the torso.
DIY TREATMENT:
Take a pain reliever, rest if you’re sore, and perform non-weight bearing exercises. You can ride the stationary bike or do core exercises. Lying around is the last thing you want to do.
VISIT THE OFFICE:
If you are experiencing leg weakness, fever, or bladder changes see you doctor. You may have an infection or nerve compression.
VERTICAL PULLS
All these exercisers involves the up and down pulling of the back. On the surface, all of these exercisers appear to be the same, but there are differences. Here’s how they stack up against each other.
ASSISTED PULLUP MACHINE
WHY USE:
This will help you work your way up to body-weight pullups.
APPLICATION:
As a beginner you can hop on the machine and perform pullups with various resistance. As you improve increase the resistance by increments of 5-10 pounds, As you work your way up to the body-weight version. The counterbalancing weight makes the downward movement easier, and should be done slowly. At the top of the movement squeeze you lats.
SAFETY FIRST:
The assisted pullup machine is safer on the shoulders. Remember on this piece of equipment, the more weight you use, the easier the exercise becomes, So, load the machine properly. You can fall off this machine.
LAT PULLDOWN
WHY USE:
The sole purpose of the lat pulldown is to build muscle mass.
APPLICATION:
As you’re doing a pulldown, the knees are being pulled into the pads as a counterbalance to the weight. This causes you to be more stable, and increases the amount of weight you can move. This exercise hits the upper-back and lats, This will help you gain strength to perform pullups.
SAFETY FIRST:
If you have shoulder problems use a neutral grip on this exercise. This will put less of a strain on the shoulder and elbow joints. Keep your shoulder blades down, and don’t shrug your shoulders.
PULLUP:
WHY USE:
Do pullups to gain athleticism and strength. They also hit the biceps.
APPLICATION:
The pullup help you to learn how to maneuver your body and strengthen your grip. If you are into gymnastics or rock climbing. This move is very difficult. So, begin with 10 sets of 2 reps. As you get stronger, you can use a dipping belt to add weight.
SAFETY FIRST:
If you have shoulder problems don’t do pullups. Start with the neutral grip. It’s easier on the shoulders and elbows.
FLOOR BACK EXTENSION
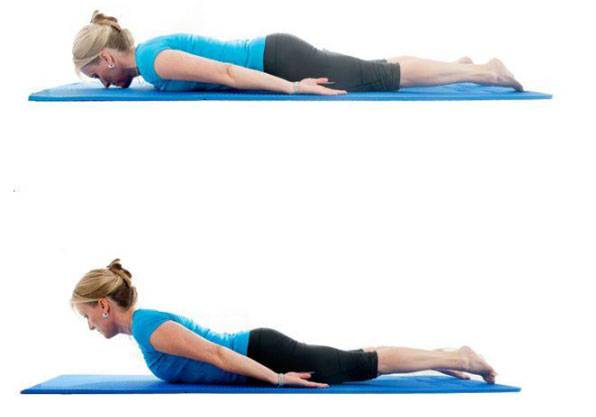
This is a bodyweight exercise that targets the lower back and core muscles. Here are the muscles that gets worked:
1. ERECTOR SPINAE
These are the muscles worked in the lower back. They help with extending and
stabilizing the spine.
2. LATISSIMUS DORSI
The lats are the largest muscles in the mid-back, and are engaged during the
extension movement.
3. TRAPEZIUS & RHOMBOIDS
These muscles are found in the upper and mid-back, and helps with stabilizing
the upper spine and shoulders during the movement.
4. CORE MUSCLES
The rectus abdominis and obliques muscles stabilize your body, and helps you to maintain balance during the movement.
This exercise is great for strengthening the lower back and enhancing core stability.
RENEGADE ARM ROW
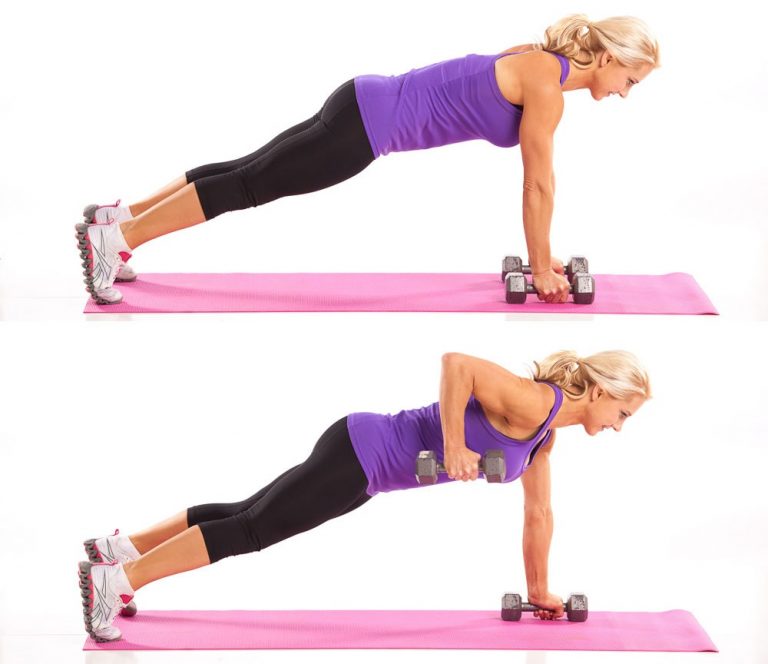
This exercise primarily targets the back, along with the upper body and core. These are the muscles worked:
A. Primary Muscles Targeted:
1. LATISSIMUS DORSI
The lats are the largest muscles in the mid-back, and assist in all pulling movements.
2. RHOMBOIDS
These muscles are located between the shoulder blades, and helps with shoulder retraction (pulling the shoulder blades together).
3. TRAPEZIUS
The middle and lower traps are targeted.
4. POSTERIOR DELTOIDS (Back shoulder)
These muscles are on the back of the shoulders, and extends the shoulder during the row.
B. Secondary Muscles Targeted:
1. BICEPS:
Assist in the pulling motion.
2. CORE MUSCLES
The rectus abdominis and obliques muscles stabilize your body, and helps you to maintain balance during the plank to do the rowing movement.
3. ERECTOR SPINAE
These muscles help maintain proper posture during the exercise.
This is a full-body exercise that places a strong emphasis on the back and core.
REVERSE FLYS
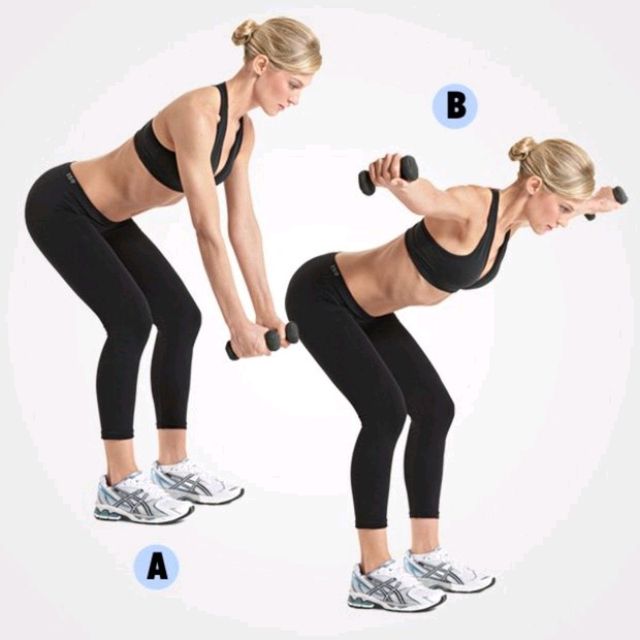
This exercise is also known as the reverse flyers or rear delt flys, and targets several upper back and shoulder muscles, primarily focusing on:
1. POSTERIOR DELTOIDS (Back shoulder)
This is the main muscle targeted in this exercise, and is responsible for shoulder
extension and external rotation.
2. RHOMBOIDS
These muscles help with retracting the shoulder blades and stabilizing the scapula.
3. TRAPEZIUS
The middle and lower traps are targeted.
4. INFRASPINATUS
Assist with external rotation of the shoulder.
5. TERES MINOR
Aids in shoulders rotation and stabilization.
This exercise improves your posture, shoulder development, and back
definition. It improves shoulder joint stability by strengthening the
posterior side of the upper body, lowering the risk of shoulder injuries.
It also improves sports performance in rowing, throwing, and swimming
due to stronger upper body and shoulder strength.
